A complete guide to understanding all back-office settings.
How to get there
From your dashboard, follow this path:
NeroPOS → NeroWeb
⚠️ Important: Always click Save Settings in the top right corner before leaving any tab or refreshing the page — unsaved changes will be lost.
Tab 1 — General
The General tab is where you set up your store's identity, appearance, and contact information.
Activating your store
Toggle Active Store to on. Your store will not be visible to customers until this is switched on.
Once active, your store URL will appear here — this is your free NeroWeb link. Share it with customers so they can browse your menu, place orders, and make bookings.
💡 Example: Your store link will look something like
https://nero.store/yourshopname
📸
Store Homepage
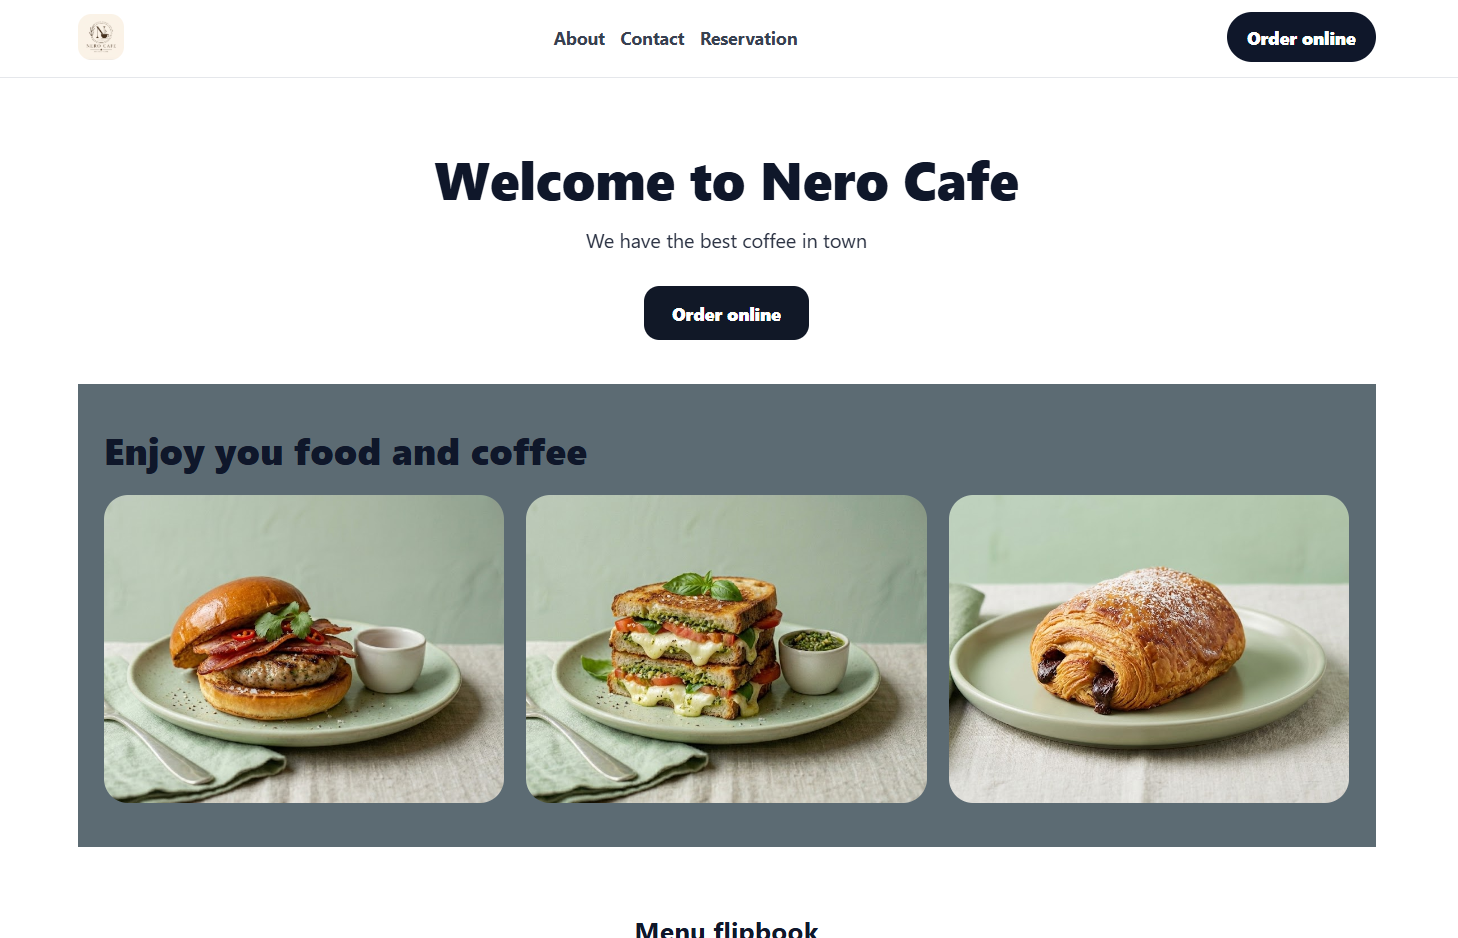
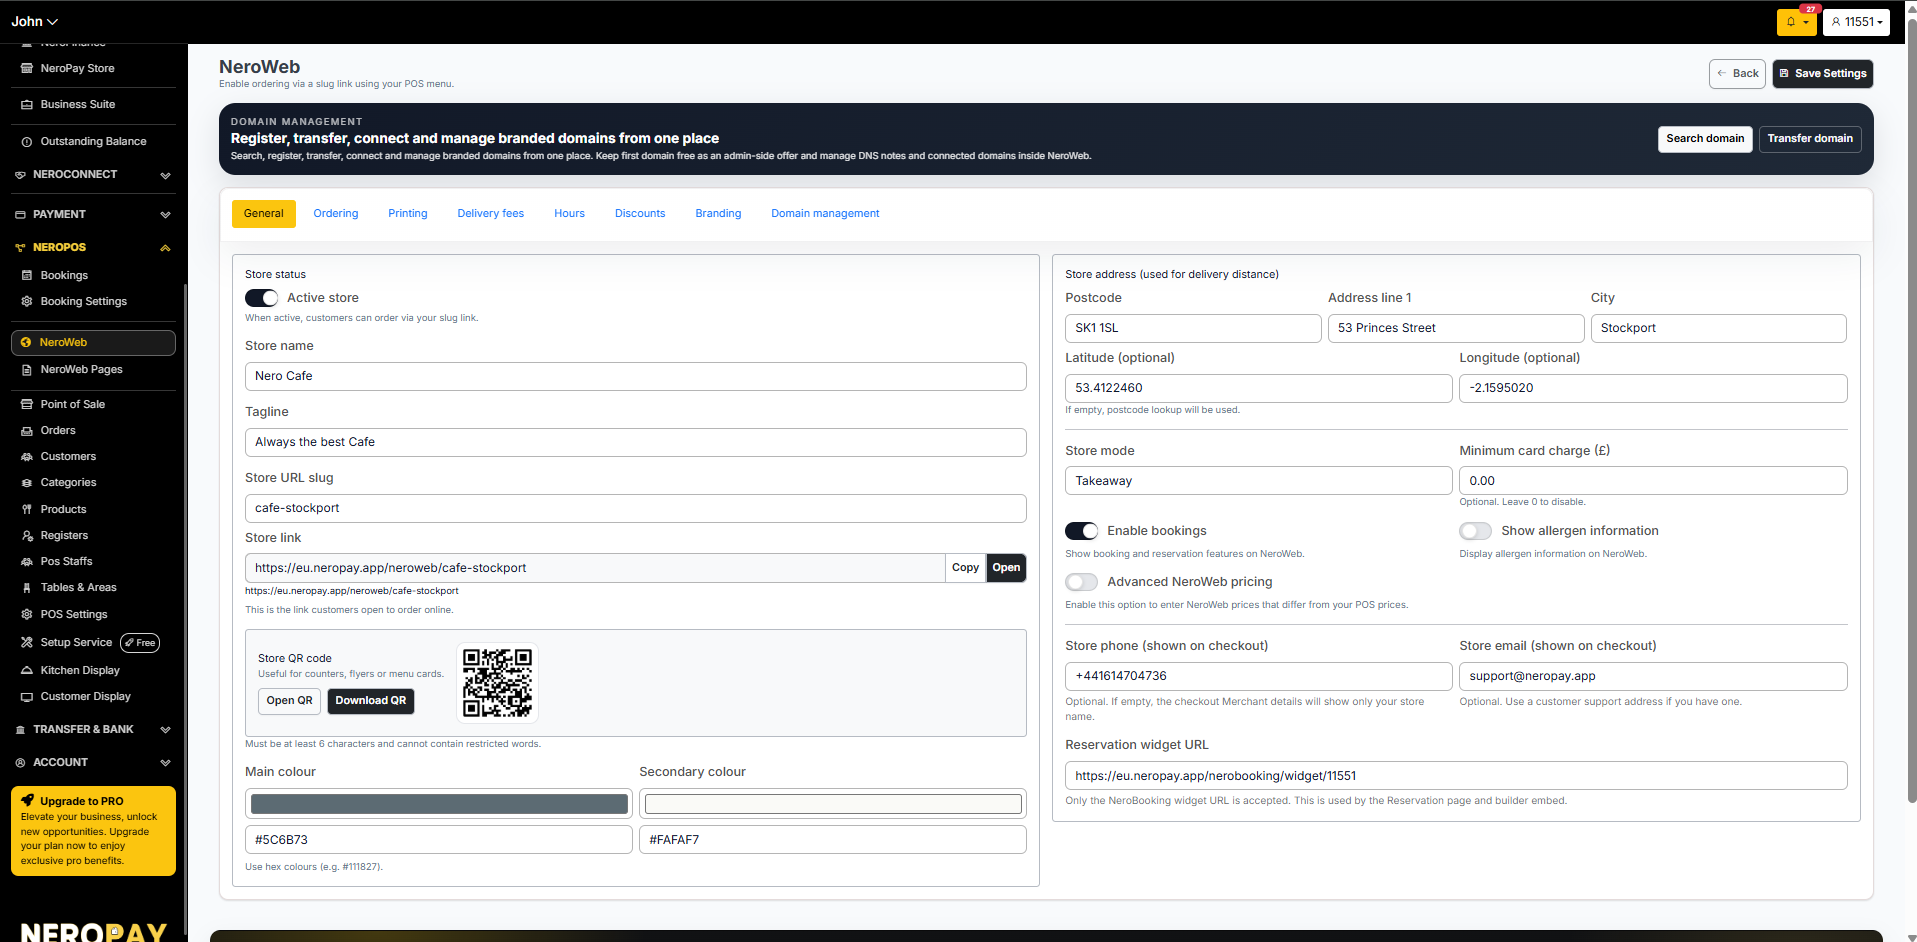
Store identity
| Setting | What it does |
|---|---|
| Store name | Your business name shown to customers |
| Short tagline | A short description or slogan shown on your store page |
| URL | Your unique store web address — customise this to match your brand |
| Store address | Your physical address shown to customers |
| Phone number | Contact number for customer enquiries |
| Email address | Contact email shown on your store |
| Allergen information | Toggle on to display allergen information for your menu items |
Visual style
Customise your store's colour scheme using Hex colour codes to match your brand. You can also add additional information on the right side of the General tab if needed.
Tab 2 — Ordering
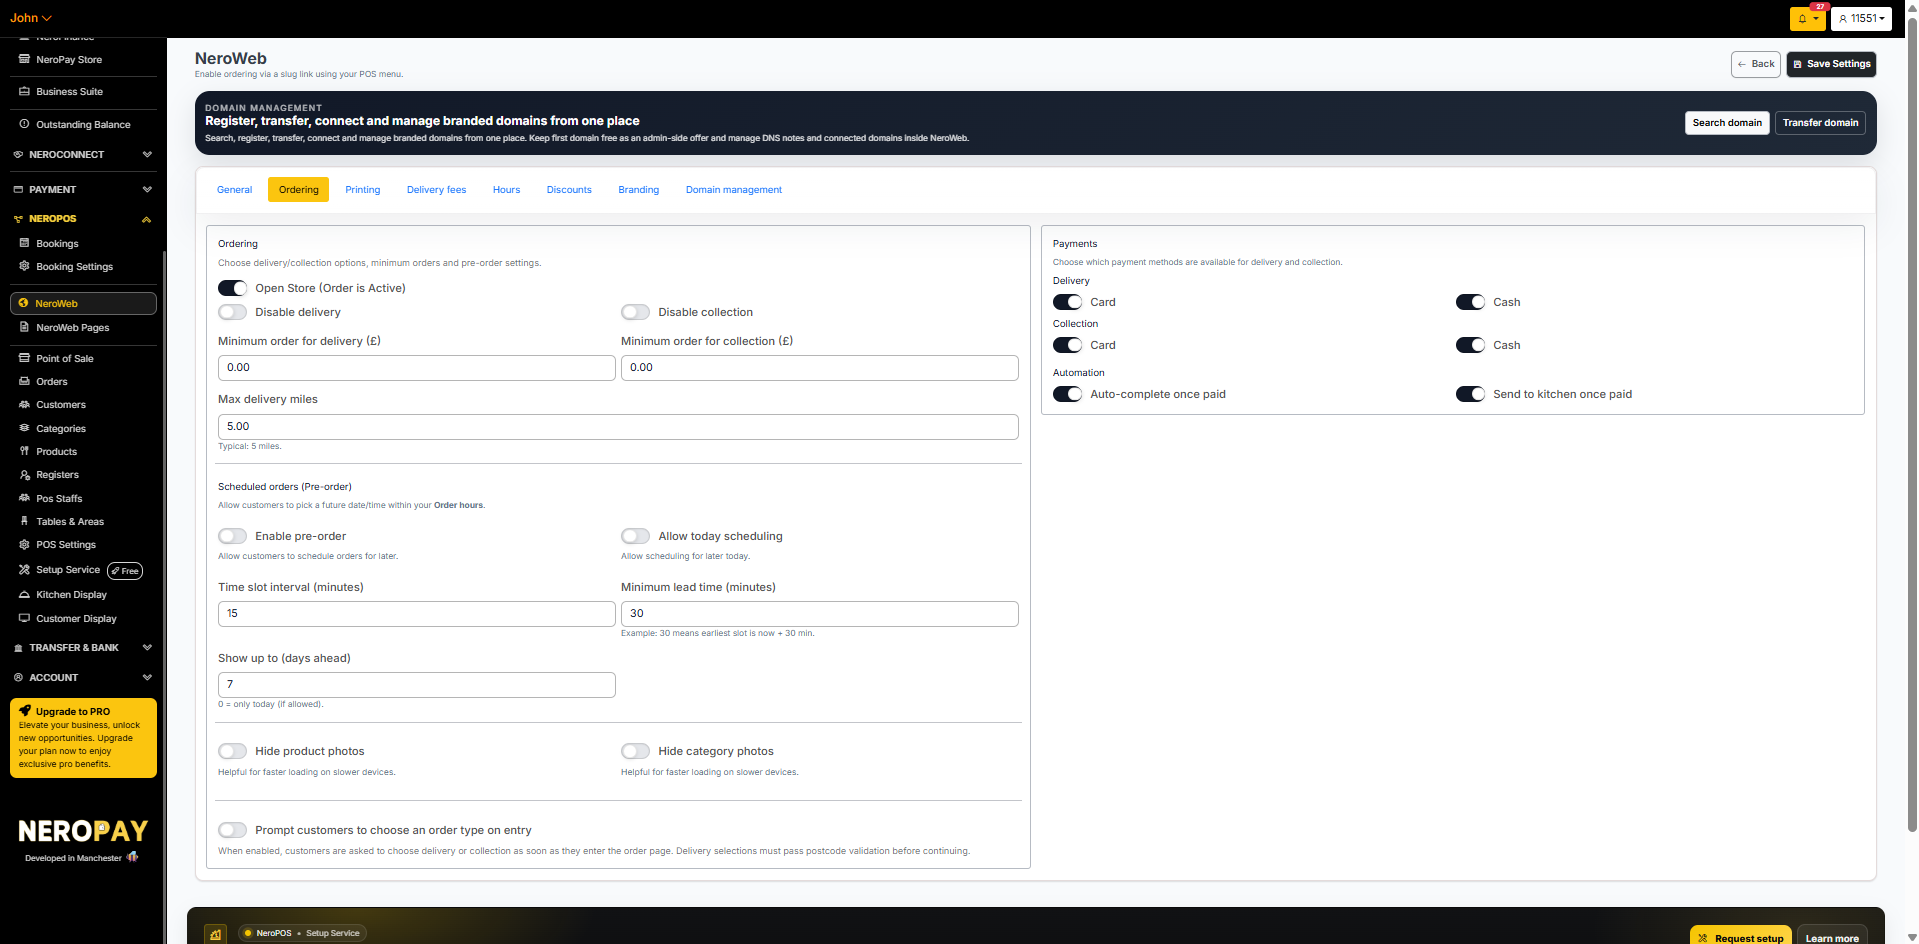
The Ordering tab controls how customers interact with your store at checkout.
Delivery logistics
| Setting | What it does |
|---|---|
| Maximum delivery range | The furthest distance you will deliver to |
| Minimum order amount — delivery | The smallest order value accepted for delivery |
| Minimum order amount — collection | The smallest order value accepted for collection |
| Enable delivery | Toggle delivery on or off |
| Enable collection | Toggle collection on or off |
Payment methods
Choose which payment methods customers can use at checkout — for example, card or cash.
Advance orders
Configure pre-order and scheduled order settings to help manage your kitchen flow — useful for busy periods or if you want customers to book orders in advance.
📸
Tab 3 — Printing
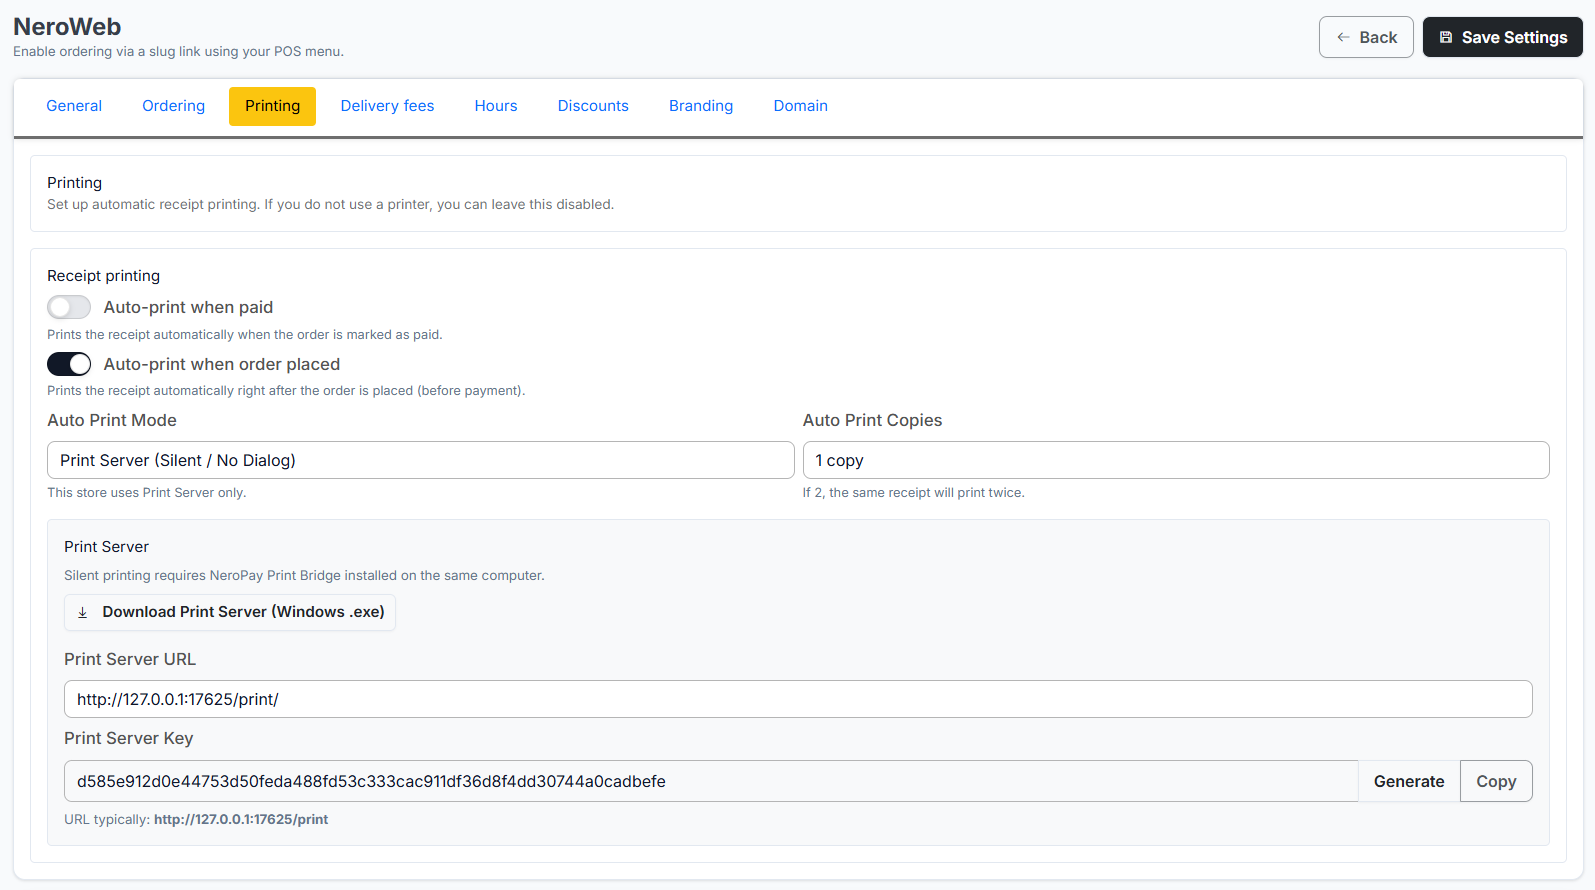
The Printing tab connects your NeroWeb online orders to your physical printer so receipts are printed automatically when an order comes in.
| Setting | What it does |
|---|---|
| Auto receipt printing | Automatically prints a receipt for every incoming online order |
| Print Server setup | Install and configure the receipt printing server |
| Print Server Key | Your unique key needed during the server setup process |
💡 Note: Setting up the Print Server is covered in full in POS settings — Printing →. The same Print Server is used for both NeroPOS and NeroWeb printing.
📸
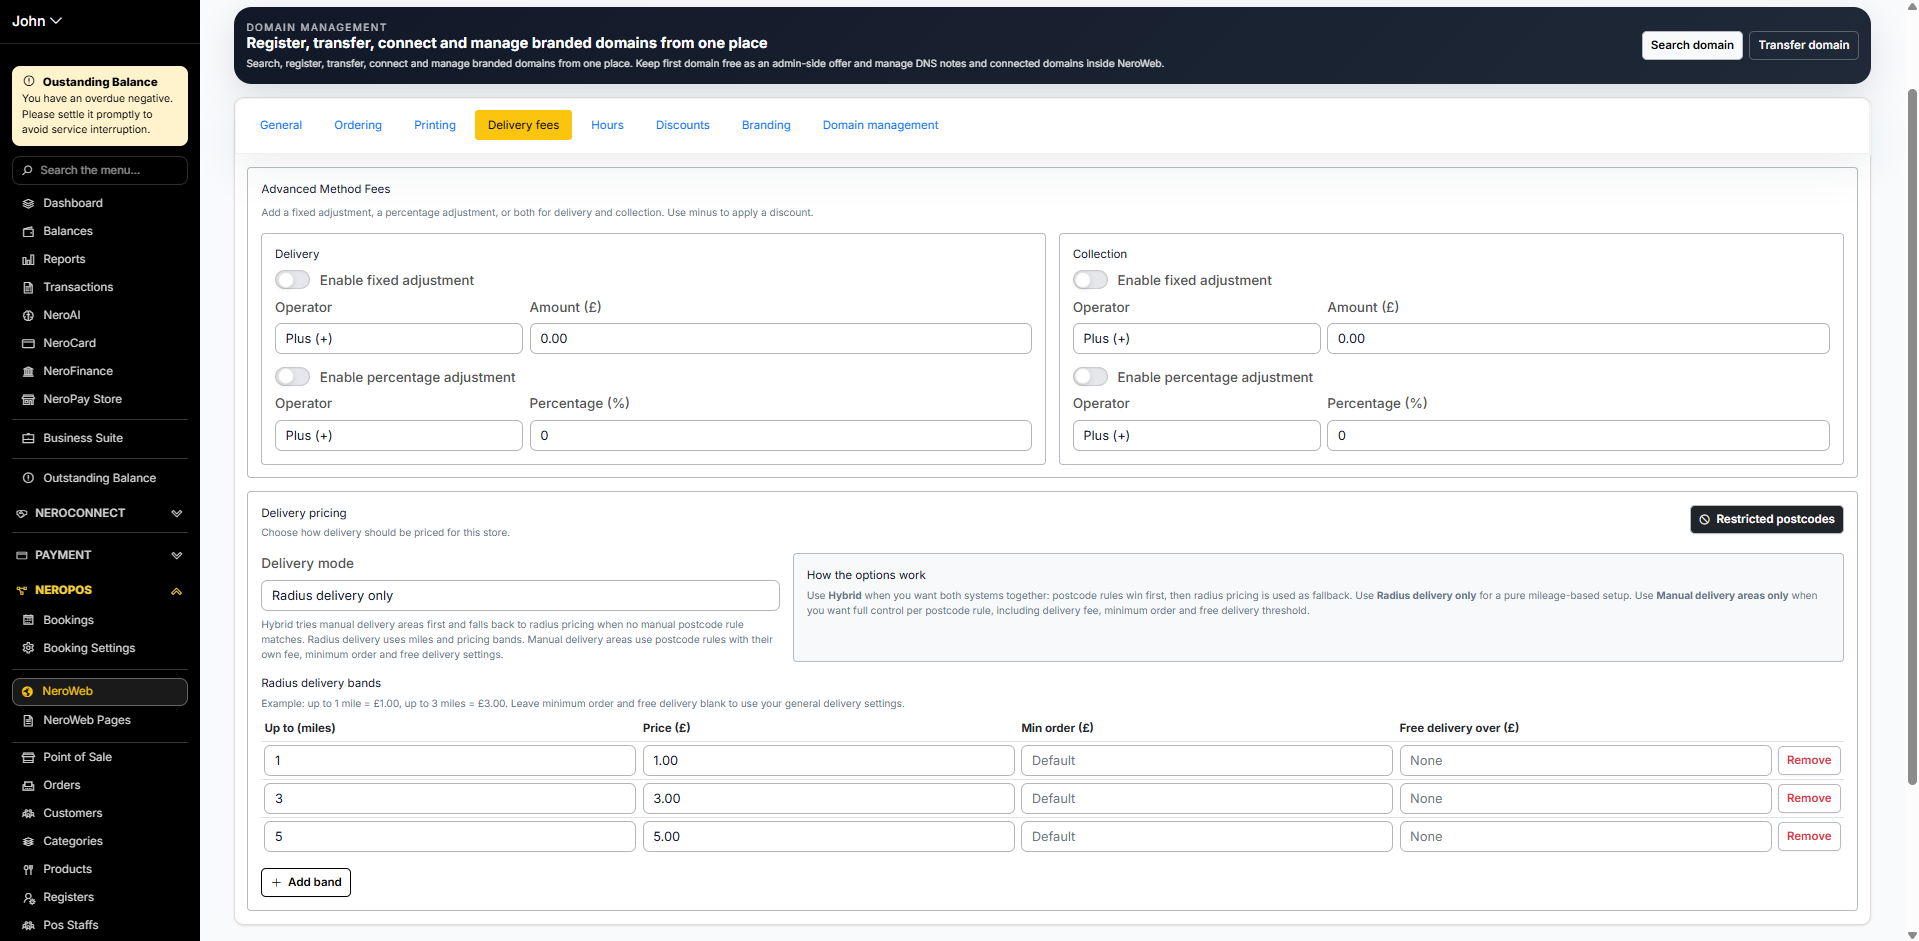
Tab 4 — Delivery fees
Set delivery charges based on the distance from your store to the customer. You can create multiple tiers so customers closer to you pay less.
- Click Add delivery fee
- Set the distance range and the corresponding fee
- Repeat to create additional tiers as needed
📸
Tab 5 — Hours
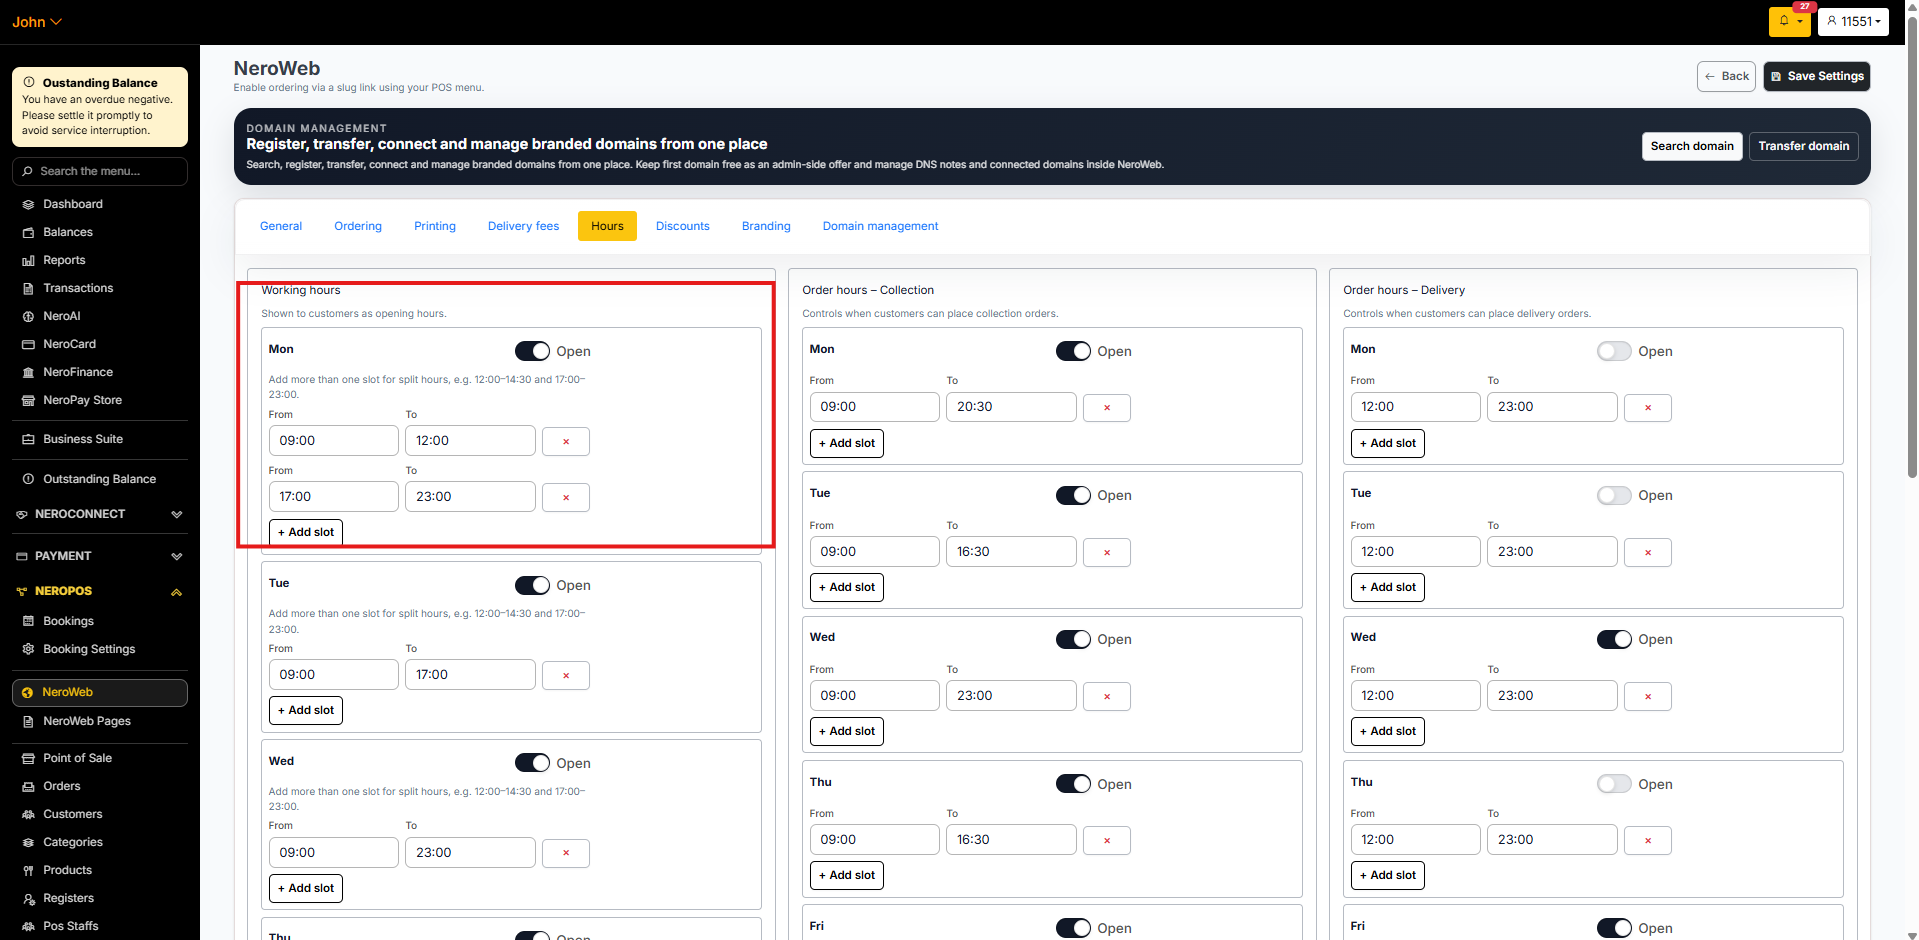
The Hours tab lets you set three separate sets of hours so you have full control over when customers can visit, collect, or order for delivery.
| Section | What it controls |
|---|---|
| Working hours | Your standard opening hours shown to customers on your store page |
| Order hours — Collection | When customers can place collection orders online |
| Order hours — Delivery | When customers can place delivery orders online |
You can set different hours for each day of the week. Toggle any day off if you are closed.
Split hours
If your business has a break in the middle of the day — for example, closed between lunch and dinner — use + Add slot to add a second time slot for that day. For example: 09:00–14:30 and 17:00–23:00.
💡 Tip: You can stop taking online orders earlier than your physical closing time. Simply set your Order hours to end before your Working hours close.
📸
Tab 6 — Branding
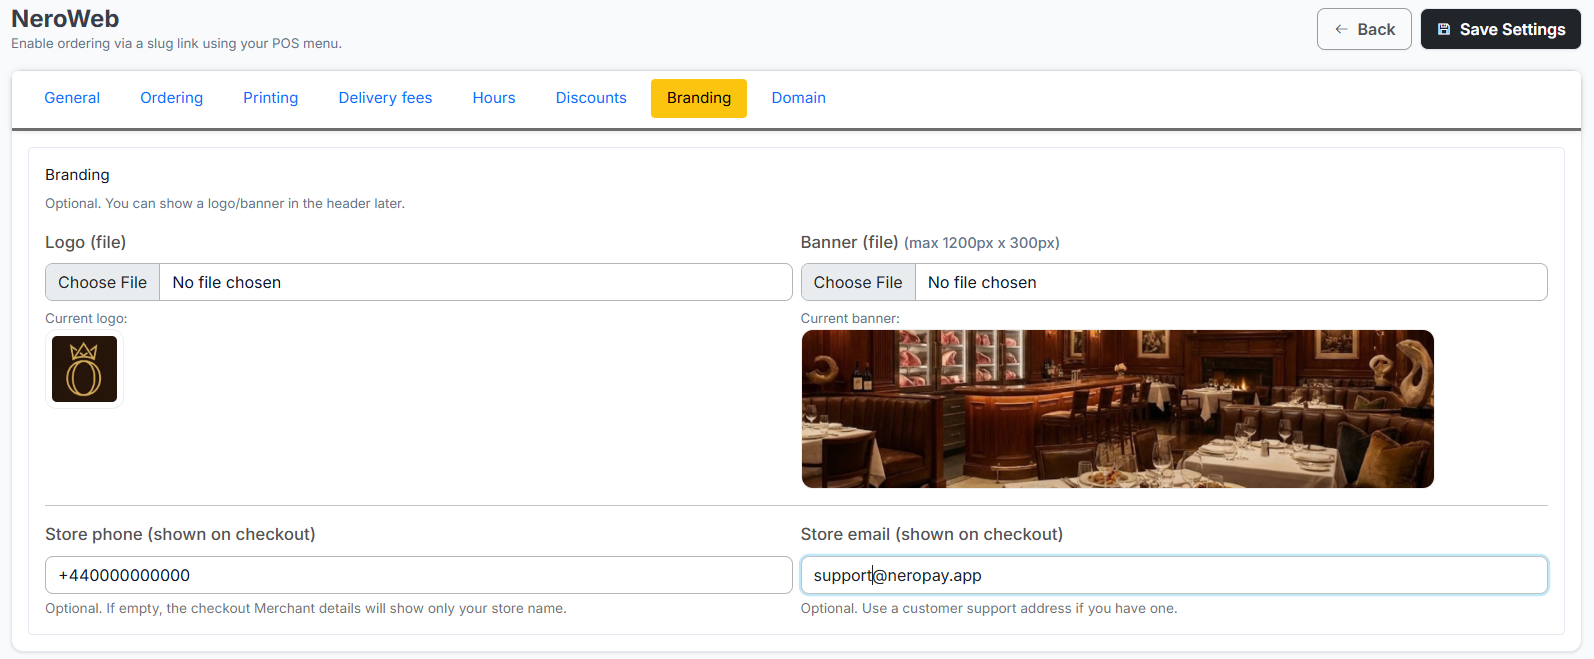
Upload your visual assets to give your NeroWeb store a professional, on-brand look.
| Setting | What it does |
|---|---|
| Business logo | Shown across your store and in customer communications |
| Banner image | The main hero image displayed at the top of your store page — use a high-quality image |
| Checkout contact number | A specific phone number displayed exclusively during the checkout process |
| Checkout contact email | A specific email address displayed exclusively during checkout |
📸
Tab 7 — Domain management
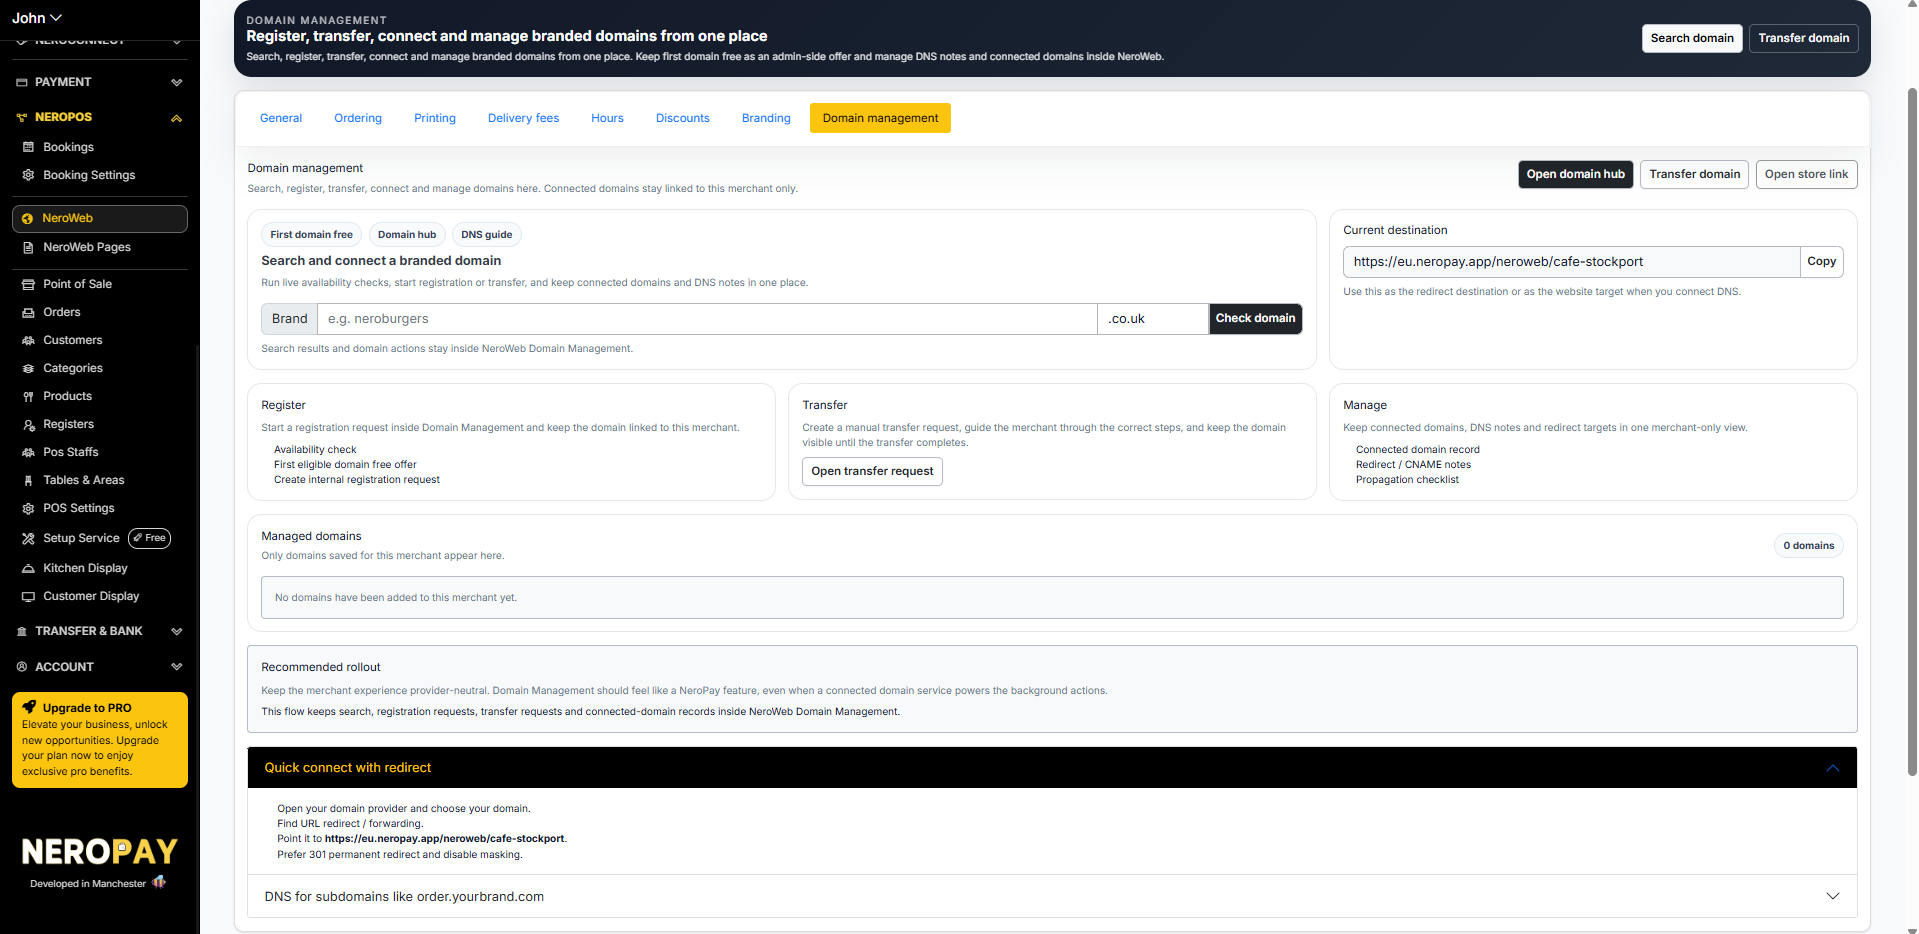
Connect a branded domain to your NeroWeb store so customers can find you at your own web address instead of the default NeroPay link.
Your current store link is shown under Current destination — you will need this when setting up a redirect or DNS connection.
You have three options:
- Register — search for and register a new domain directly. Your first eligible domain is free
- Transfer — move an existing domain from another provider to NeroPay
- Quick connect with redirect — keep your domain with your current provider and point it to your NeroWeb link using a 301 redirect. Go to your domain provider, find URL forwarding, and point it to your Current destination URL
For a fully branded experience such as order.yourbrand.com, use the DNS option to connect via a CNAME record. DNS changes can take up to 48 hours to propagate.
💡 Need help with domain forwarding? Let us know your domain provider — such as Cloudflare, GoDaddy, or Namecheap — and we can point you to the exact steps.
📸
Frequently asked questions
Q: My store is set up but customers can't see it — what's wrong? A: Make sure the Active Store toggle on the General tab is switched on. Your store will not be visible until this is enabled.
Q: Can I set different collection and delivery hours from my opening hours? A: Yes. The Hours tab has three separate sections — Working hours, Order hours for Collection, and Order hours for Delivery. Each can be configured independently.
Q: Can I offer free delivery for orders over a certain amount? A: Delivery fee configuration is distance-based in the Delivery fees tab. For order-value-based free delivery, contact support to discuss your options.
Q: How do I remove a discount code once a promotion has ended? A: Go to the Discounts tab, find the code, and delete or disable it. Customers will no longer be able to use it at checkout.
Q: Can I use the same Print Server for NeroWeb and NeroPOS? A: Yes. The same Print Server handles printing for both. See POS settings — Printing → for the full setup guide.
Still need help? Contact us at support@neropay.app or create a ticket