How to get there
From your dashboard, follow this path:
Account → Payment Settings
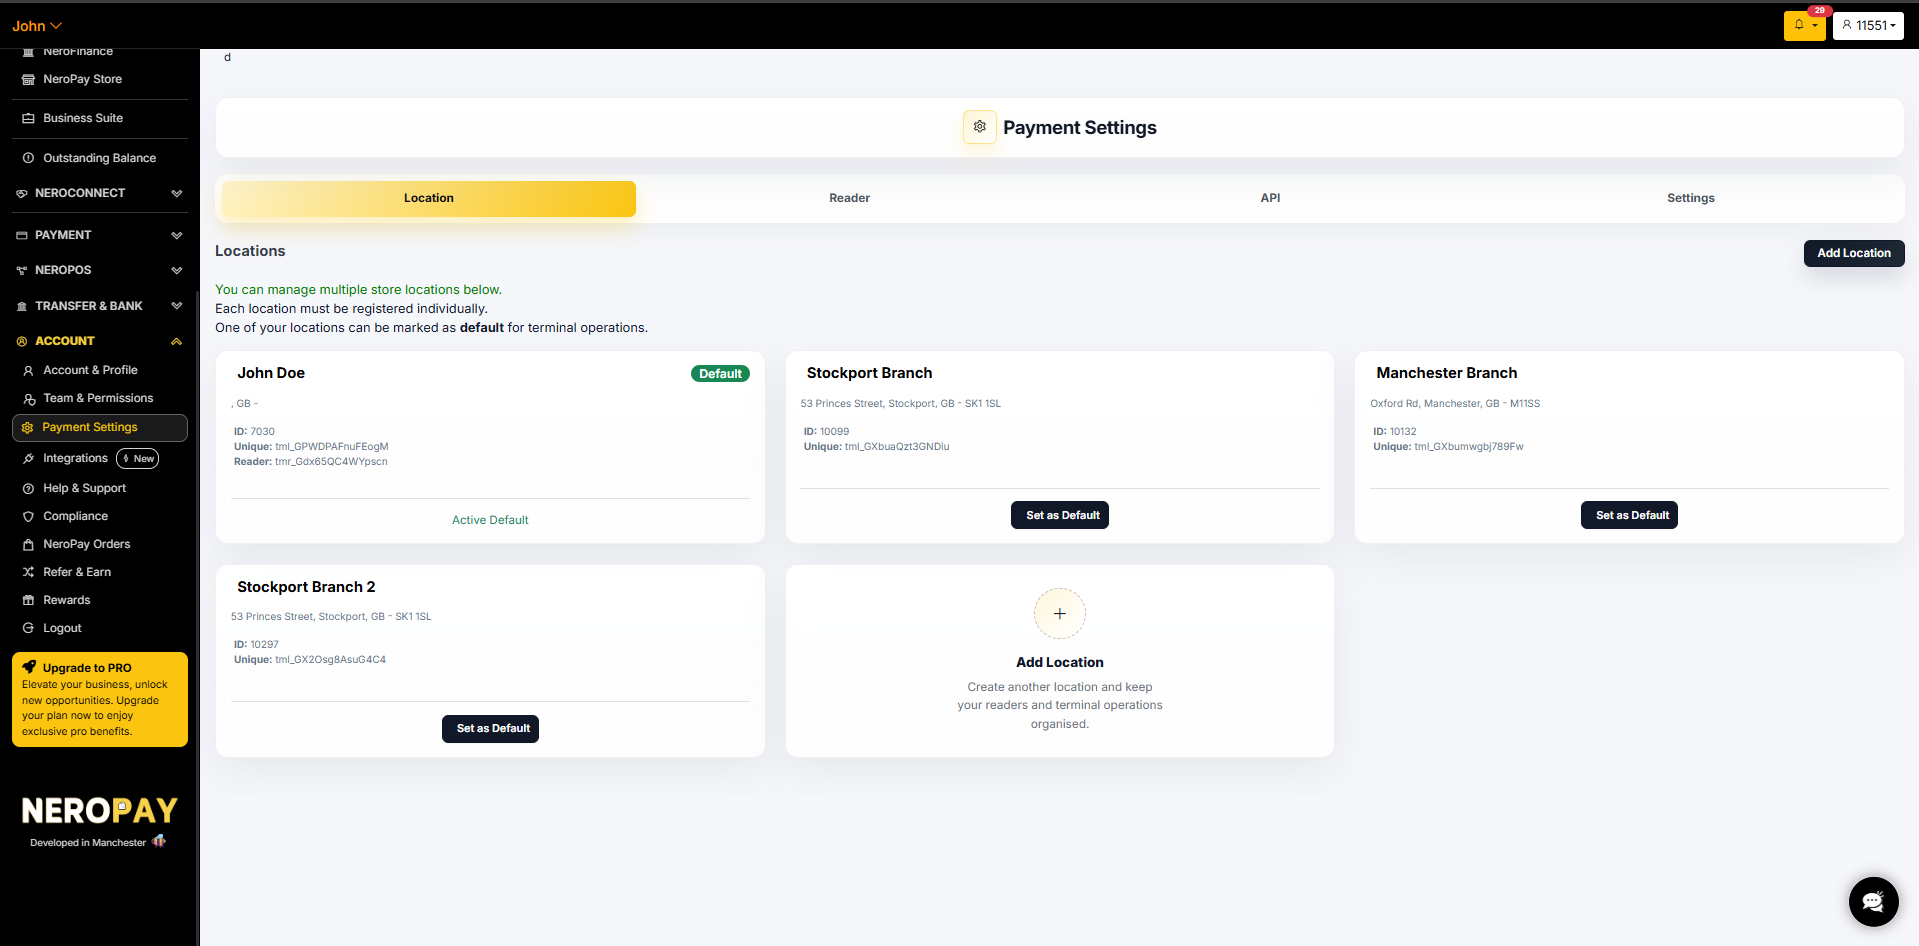
Tab 1 — Location
Add your business location so NeroPay can associate your terminal with the correct site. If you have multiple branches, you can add each one here and assign terminals accordingly.
💡 Tip: Adding accurate location details also allows NeroPay to monitor your terminal via GPS and other security measures for your protection.
📸
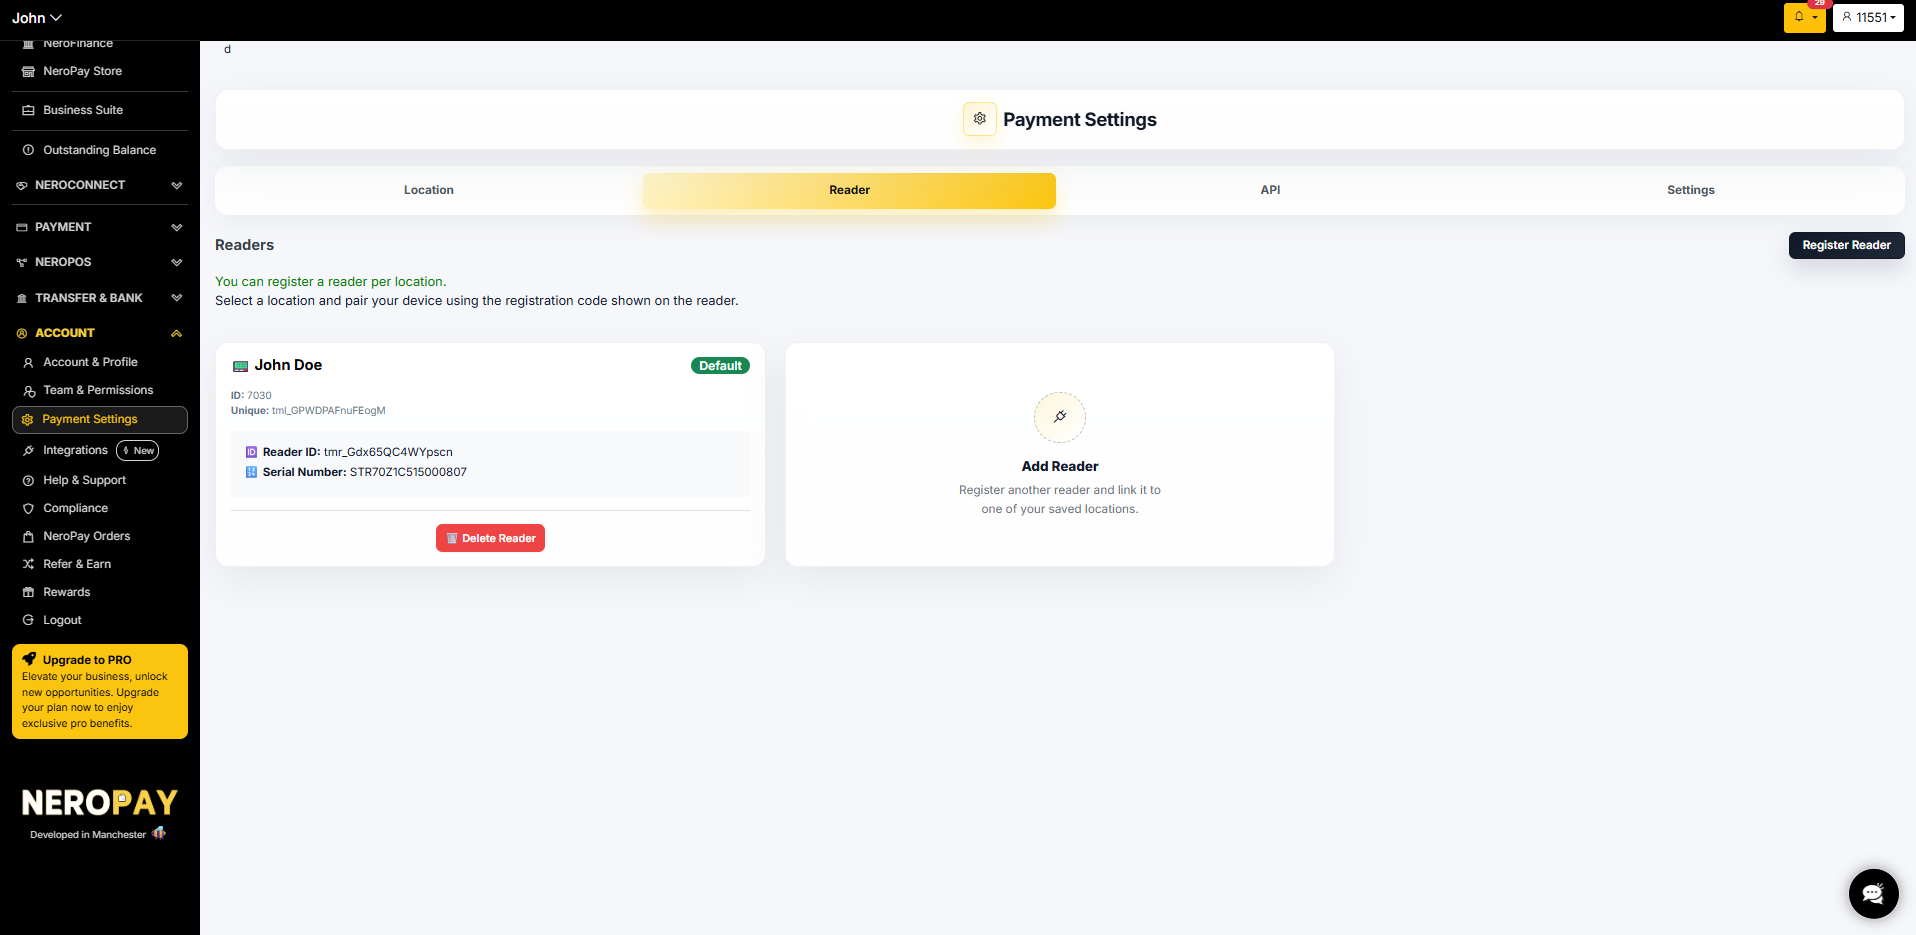
Tab 2 — Reader
The Reader tab shows all terminals registered to your account. NeroPay configures and registers your terminal before it is sent to you — you do not need to set this up yourself.
⚠️ Important: Do not delete your terminal registration. If the registration is removed, your terminal will stop working and will need to be re-paired. Contact support if you need to make any changes to your reader setup.
Each registered terminal shows:
- Terminal ID — your unique device identifier
- Terminal ownership — for example, Rented
📸
💡 Returning your terminal? See Returning your terminal → for the full return process.
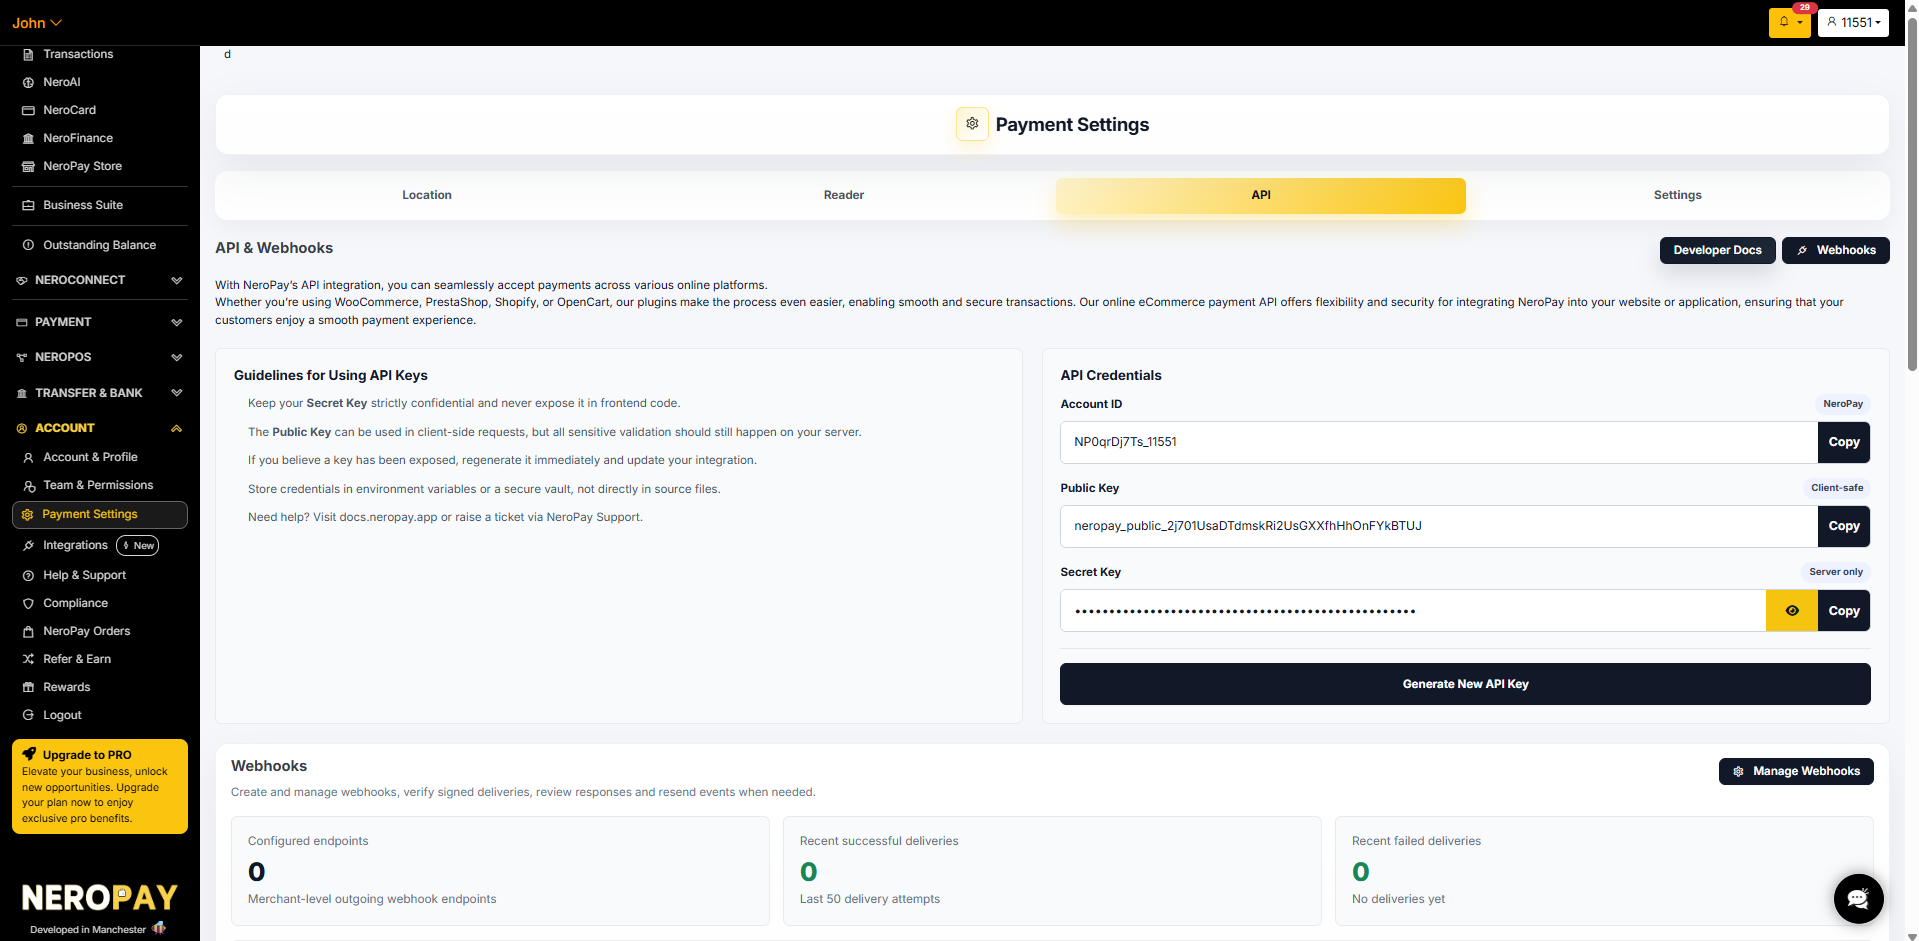
Tab 3 — API
The API tab gives you access to your API credentials and webhook management — used when integrating NeroPay into your website or third-party platform.
API credentials
| Field | What it is |
|---|---|
| Account ID | Your unique NeroPay account identifier |
| Public key | Client-safe — can be used in client-side requests |
| Secret key | Server only — keep this strictly confidential and never expose it in frontend code |
Click Copy to copy any key. Click Generate New API Key to regenerate your keys if you believe they have been compromised.
⚠️ Security guidelines:
- Keep your Secret Key strictly confidential — never expose it in frontend code
- If you believe a key has been exposed, regenerate it immediately and update your integration
- Store credentials in environment variables or a secure vault — not directly in source files
- All sensitive validation should happen on your server, not client-side
Webhooks
The Webhooks section lets you create and manage webhook endpoints — used to receive automatic notifications when payment events occur.
From this panel you can see:
- Configured endpoints
- Recent successful deliveries
- Recent failed deliveries
- Last 10 delivery history
Click Manage Webhooks to add or edit endpoints.
💡 Need help with the API? Visit docs.neropay.app or see REST API overview → for full developer documentation.
📸 [Screenshot: API tab showing credentials and webhooks panel]
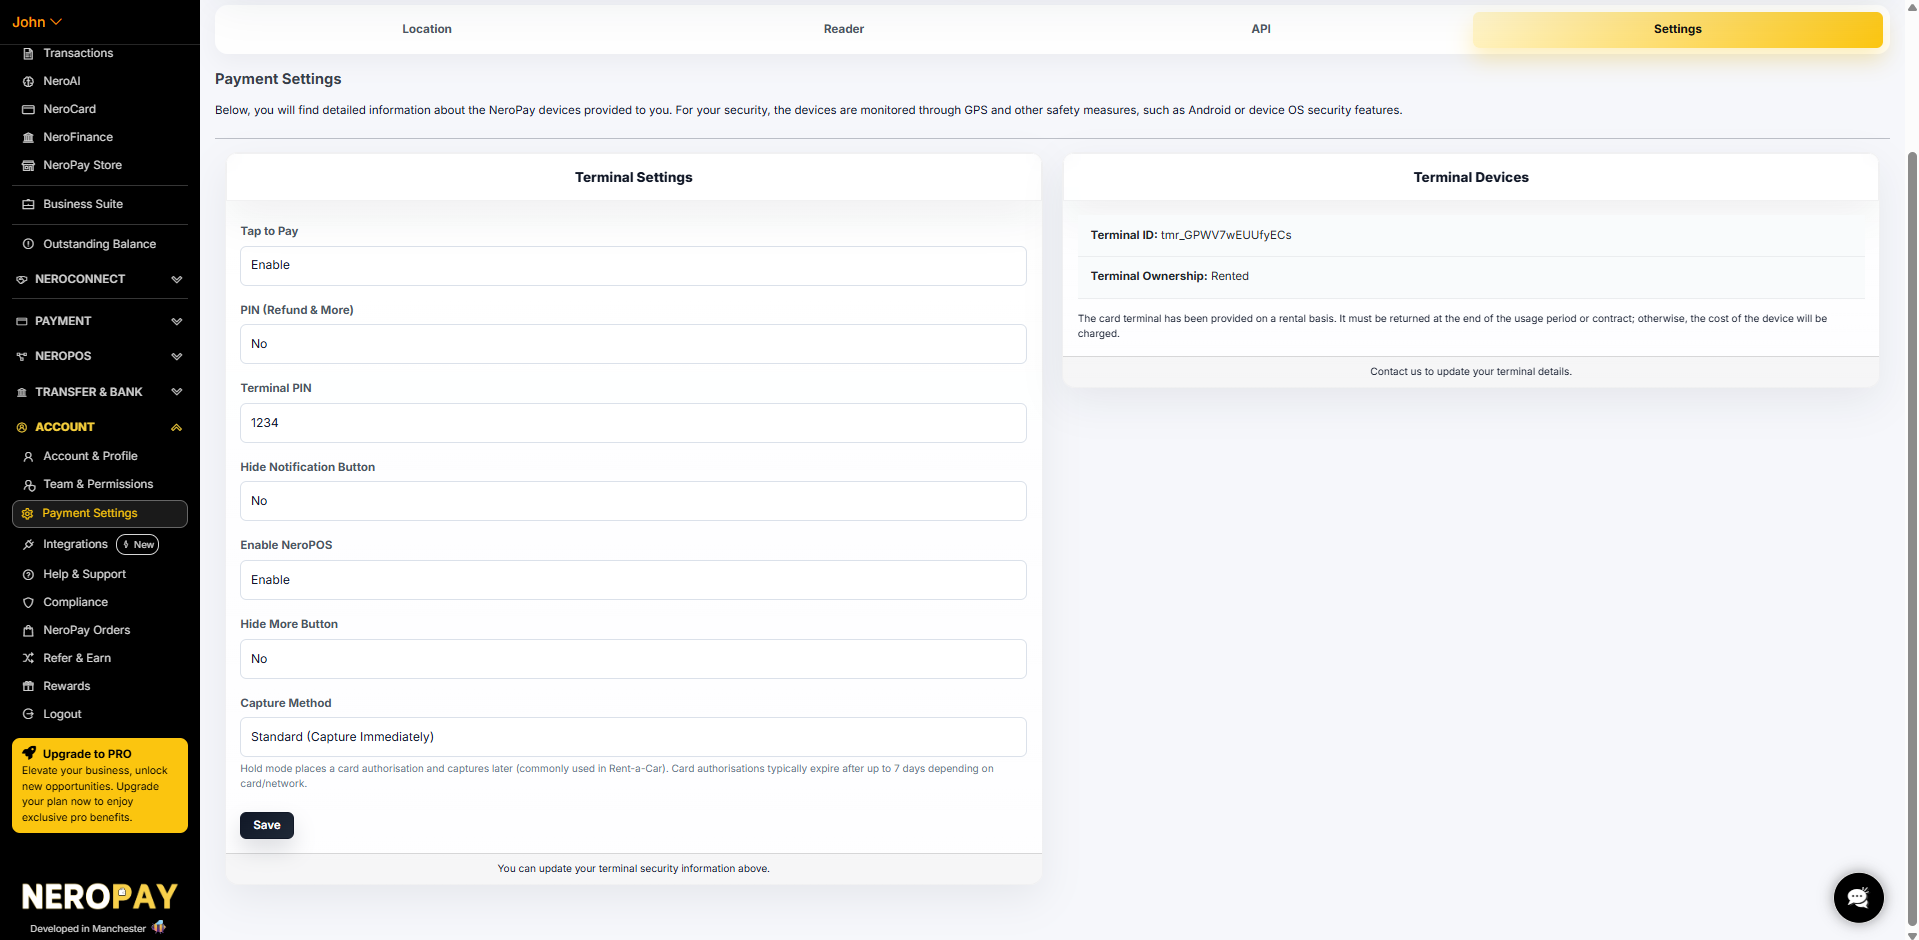
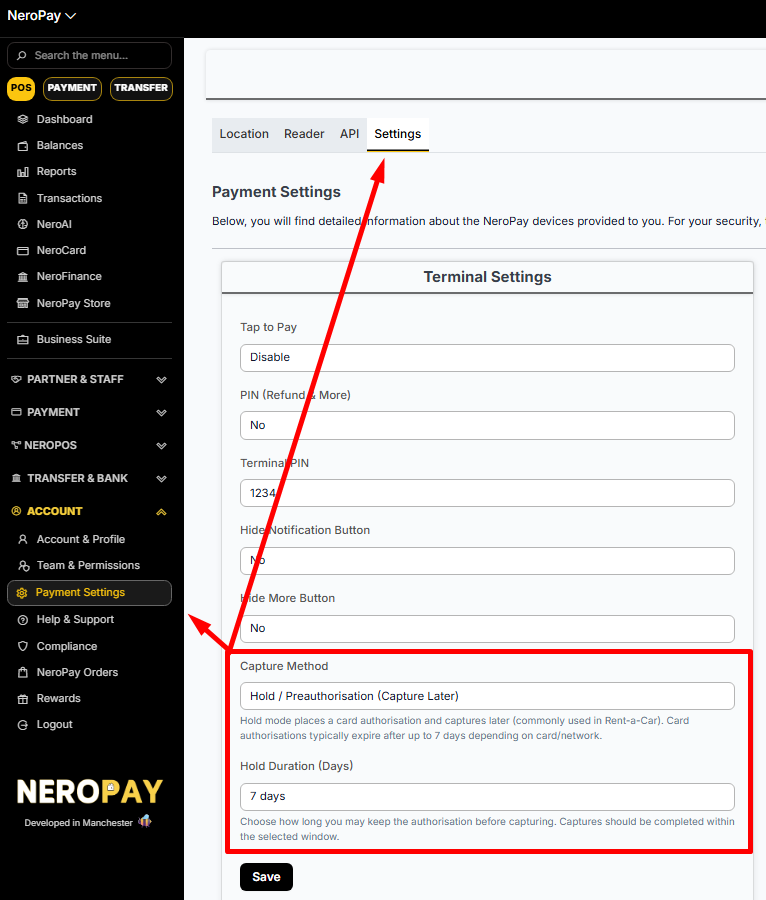
Tab 4 — Settings
The Settings tab controls your terminal behaviour and capture method.
Terminal settings
| Setting | What it does |
|---|---|
| Tap to Pay | Enable or disable contactless tap-to-pay on your terminal |
| PIN (Refund & More) | Require a PIN to access refunds and the More menu |
| Terminal PIN | Set or update your terminal PIN |
| Hide notification button | Show or hide the notification button on the terminal screen |
| Enable NeroPOS | Enable or disable the NeroPOS integration on this terminal |
| Hide More button | Remove the More button from the terminal screen |
| Capture method | Set how payments are captured — Standard (immediately) or Manual (hold mode) |
📸 [Screenshot: Settings tab showing terminal settings and capture method]
Capture method — Standard vs Manual
Standard (Capture Immediately) The default setting. Payments are captured and charged to the customer instantly when the transaction is approved.
Manual (Hold mode — Preauthorised payments) The customer's card is held for an amount but no money is taken yet. You capture or cancel the payment later once the final amount is known.
💡 Typical use cases: car rental deposits, hotel check-ins, damage guarantees — anywhere the final charge may differ from the initial amount.
How to set up Manual capture
- Go to Account → Payment Settings → Settings → Capture Method
- Select Manual
- Set your Hold Duration — the number of days to keep the authorisation open before capturing. The maximum is 7 days
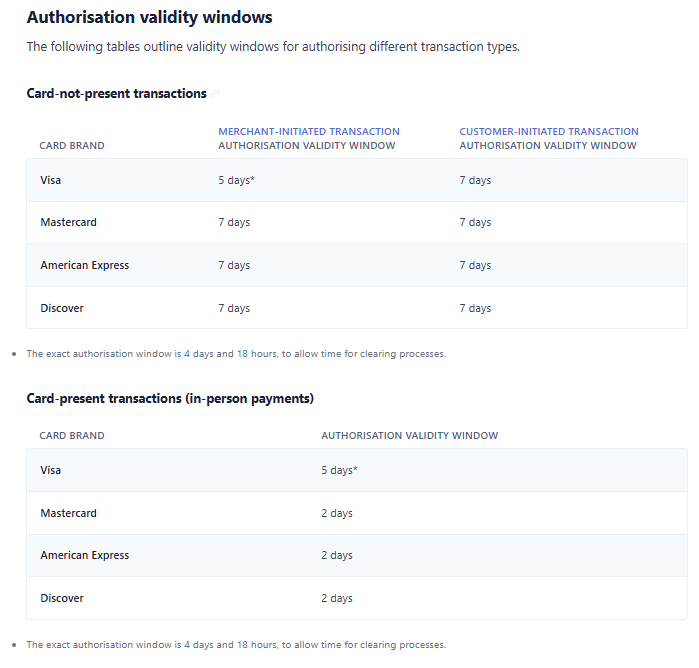
⚠️ Important: Card networks set their own expiry limits. For in-person payments, Mastercard, Amex, and Discover authorisations can expire in as little as 2 days. Always capture before the window closes — once expired, the hold drops and funds cannot be collected.
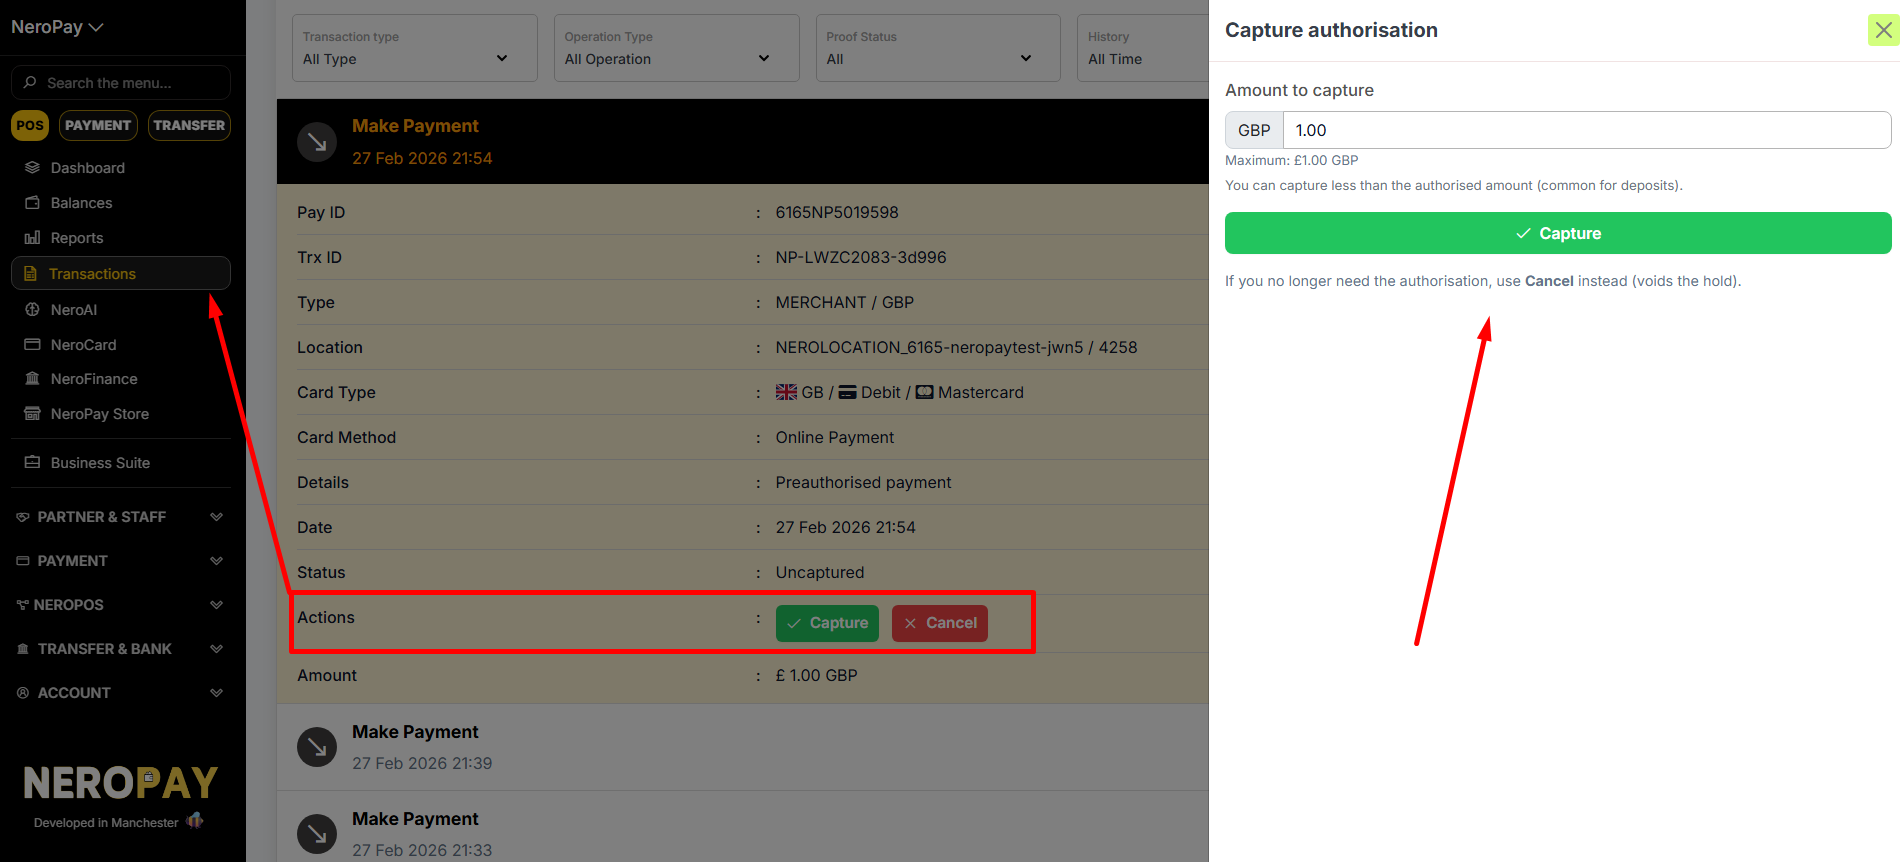
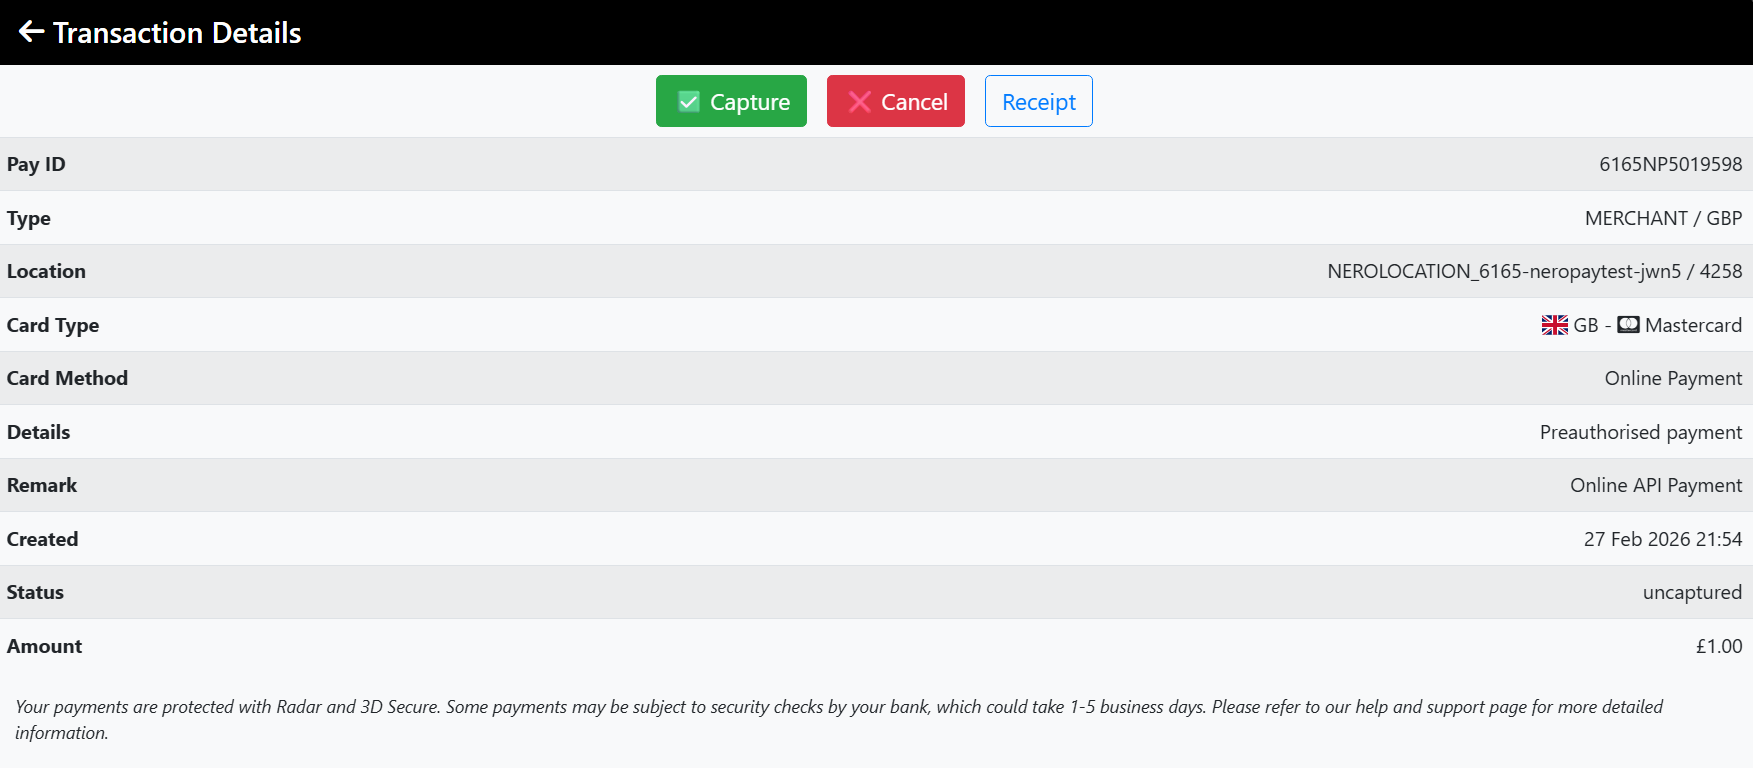
How to capture or cancel
Once a payment is preauthorised it will show as Uncaptured. Manage it from two places:
From the Dashboard:
- Go to Transactions
- Select the transaction
- Click Capture or Cancel
📸 [Screenshot: Transaction showing Capture and Cancel options]
From the Terminal:
- Go to Transactions
- Select the transaction
- Tap Capture or Cancel
📸 [Screenshot: Terminal transaction screen showing Capture and Cancel]
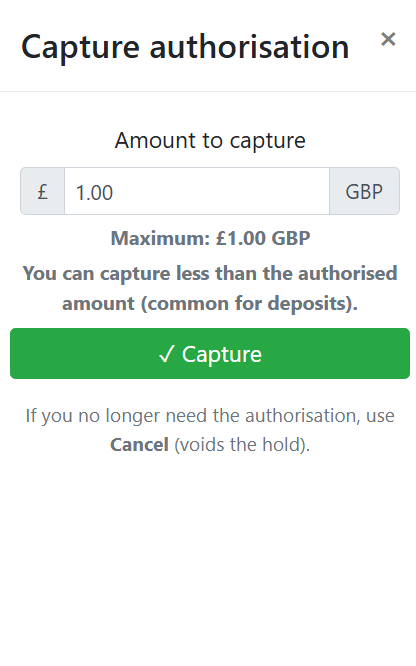
Capturing a different amount
You can capture less than the originally authorised amount. The difference is automatically released back to the customer.
💡 Example: You authorise £200 as a deposit. The final charge is £35. You capture £35 — the remaining £165 is released to the customer automatically.
Frequently asked questions
Q: What happens if I don't capture in time? A: The authorisation expires and the hold is released. No funds can be collected — you would need to take a new payment.
Q: Does the customer get charged straight away with Manual capture? A: No. They see a pending hold on their account. The charge only goes through when you capture. If you cancel, the hold disappears with no charge.
Q: Does Manual capture apply to online payments too? A: Yes. When Manual capture is enabled, it applies to all payment types — terminal, online, payment links, and tap-to-pay.
Q: Can I change my capture method at any time? A: Yes. Go to Payment Settings → Settings and update the Capture Method, then click Save.
Q: What should I do if my terminal stops working after I made changes here? A: Contact support immediately — do not delete your terminal registration. Our team can help restore your terminal setup.
Still need help? Contact us at support@neropay.app or create a ticket
Location: you need to add a location for your business, so you could also locate the terminal by adding these locations
2. reader
which is terminal here, we will set up for you before sending out, but be careful not to delete teh registration
3. API
if there are anything unclear for you, please go to API developer manual(hyperlink)
4. Setting
here
How it works
Preauthorised payment is a two-step process:
Step 1 — Authorise The customer's card is held for an amount. No money is taken yet — the customer will see a pending hold on their account.
Step 2 — Capture or Cancel Once you know the final amount, you either:
- Capture — collect the funds (in full or partially)
- Cancel — release the hold with no charge to the customer
💡 Typical use cases: car rental deposits, hotel check-ins, damage guarantees — anywhere the final charge may differ from the initial amount.
Setting it up
Navigate to:
Dashboard → Account → Payment Settings → Settings → Capture Method
📸
Select Manual, then set your Hold Duration — this is how many days to keep the authorisation open before capturing. The maximum is 7 days.
⚠️ Important: Card networks set their own expiry limits. For in-person payments, Mastercard, Amex, and Discover authorisations can expire in as little as 2 days. Always capture before the window closes — once expired, the hold drops and funds cannot be collected.
How to capture or cancel
Once a payment is preauthorised, it will show as Uncaptured. You can manage it from two places:
From the Dashboard
- Go to Transactions
- Select the transaction
- Click Capture or Cancel
📸
From the Terminal
- Go to Transactions
- Select the transaction
- Tap Capture or Cancel
📸
Capturing a different amount
You can capture less than the originally authorised amount. The difference is automatically released back to the customer — no manual action needed.
💡 Example: You authorise £200 as a deposit. The final charge is £35. You capture £35 — the remaining £165 is released to the customer automatically.
Frequently asked questions
Q: What happens if I don't capture in time? A: The authorisation expires and the hold is released. No funds can be collected. You would need to take a new payment from the customer.
Q: Does the customer get charged straight away? A: No. They see a pending hold on their account. The charge only goes through when you capture. If you cancel, the hold disappears with no charge.
Q: Does this apply to online payments too? A: Yes. When Manual capture is enabled, it applies to all payment types — terminal, online, payment links, and tap-to-pay.
Still need help? Contact us at support@neropay.app or create a ticket