Before you start
- You have at least one location set up — see Booking settings
- You have decided which services require a deposit or full payment upfront
Part 1 — Adding and configuring a service
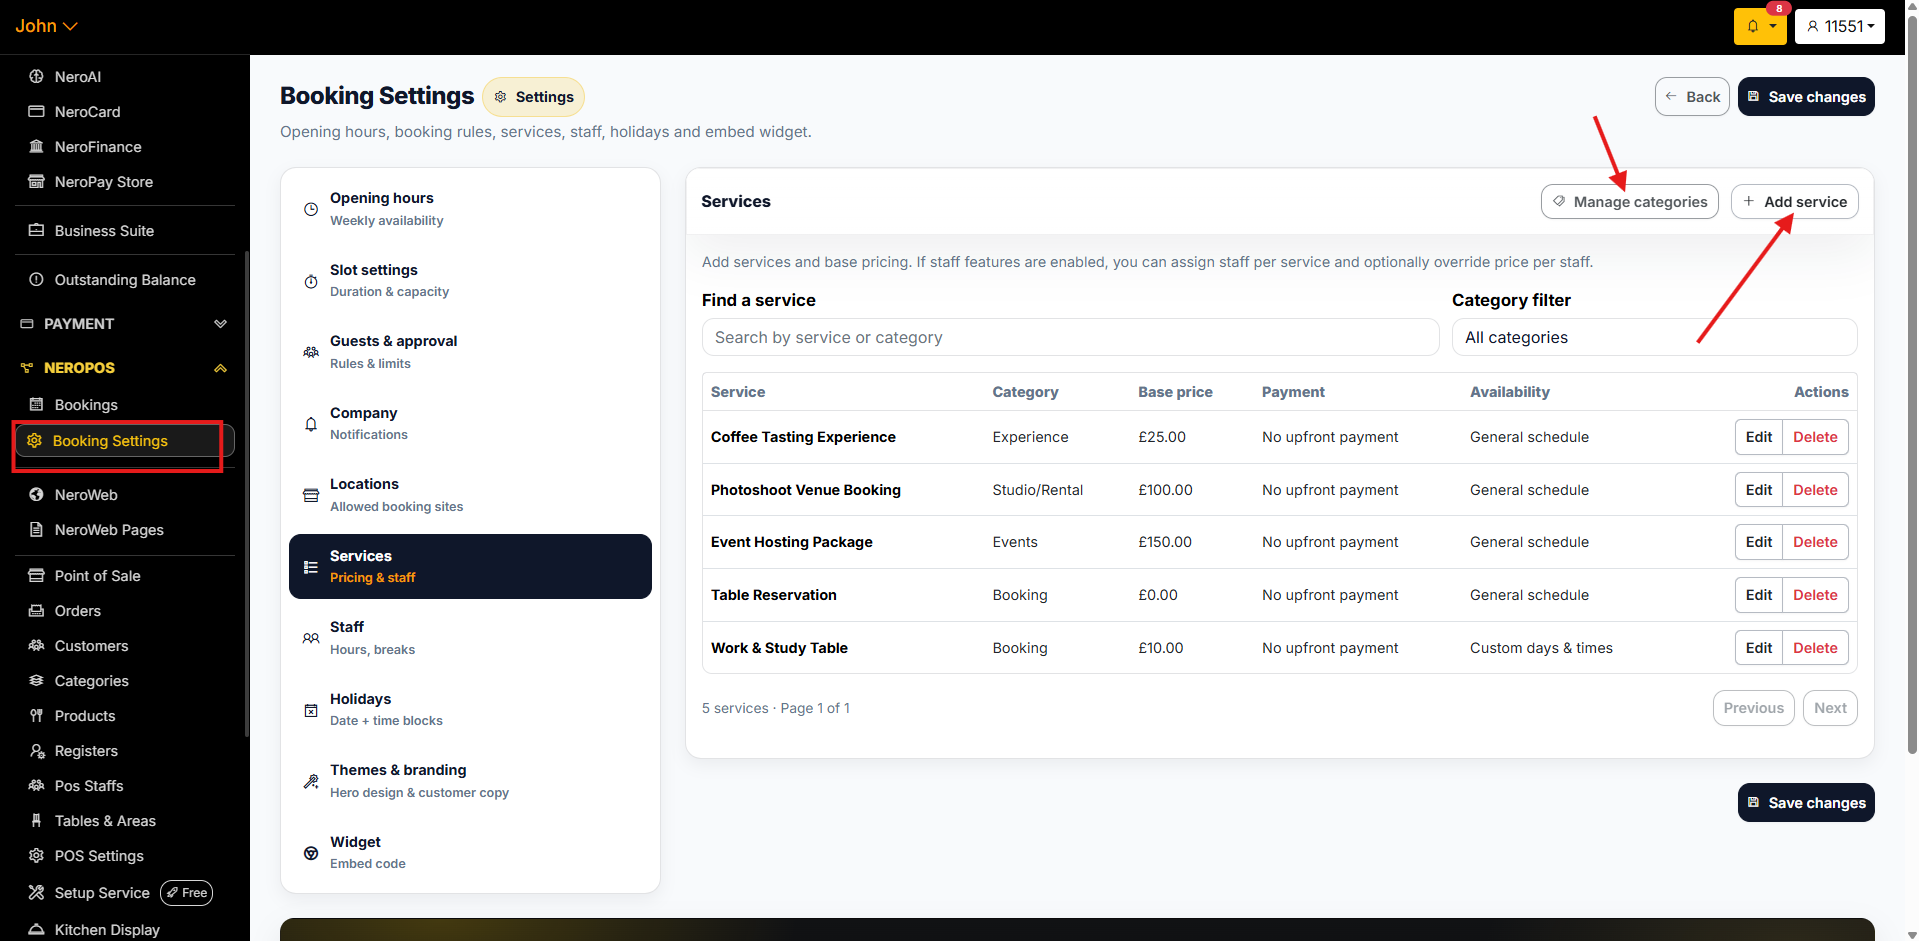
Step 1 — Go to Services
From your dashboard, follow this path:
NeroPOS → Bookings → Booking Settings → Services
You'll see a list of your existing services, and click on each with an Edit button.
📸
Step 2 — Add or edit a service
Click Add service to create a new one, or click Edit next to an existing service to update it.
Step 3 — Enter service details
Fill in the following fields:
- Name — what the customer will see on the booking page
- Category — group services together for easier navigation
- Description — a short explanation of what the service includes
- Photo — optional, but recommended for visual businesses like salons or restaurants
📸
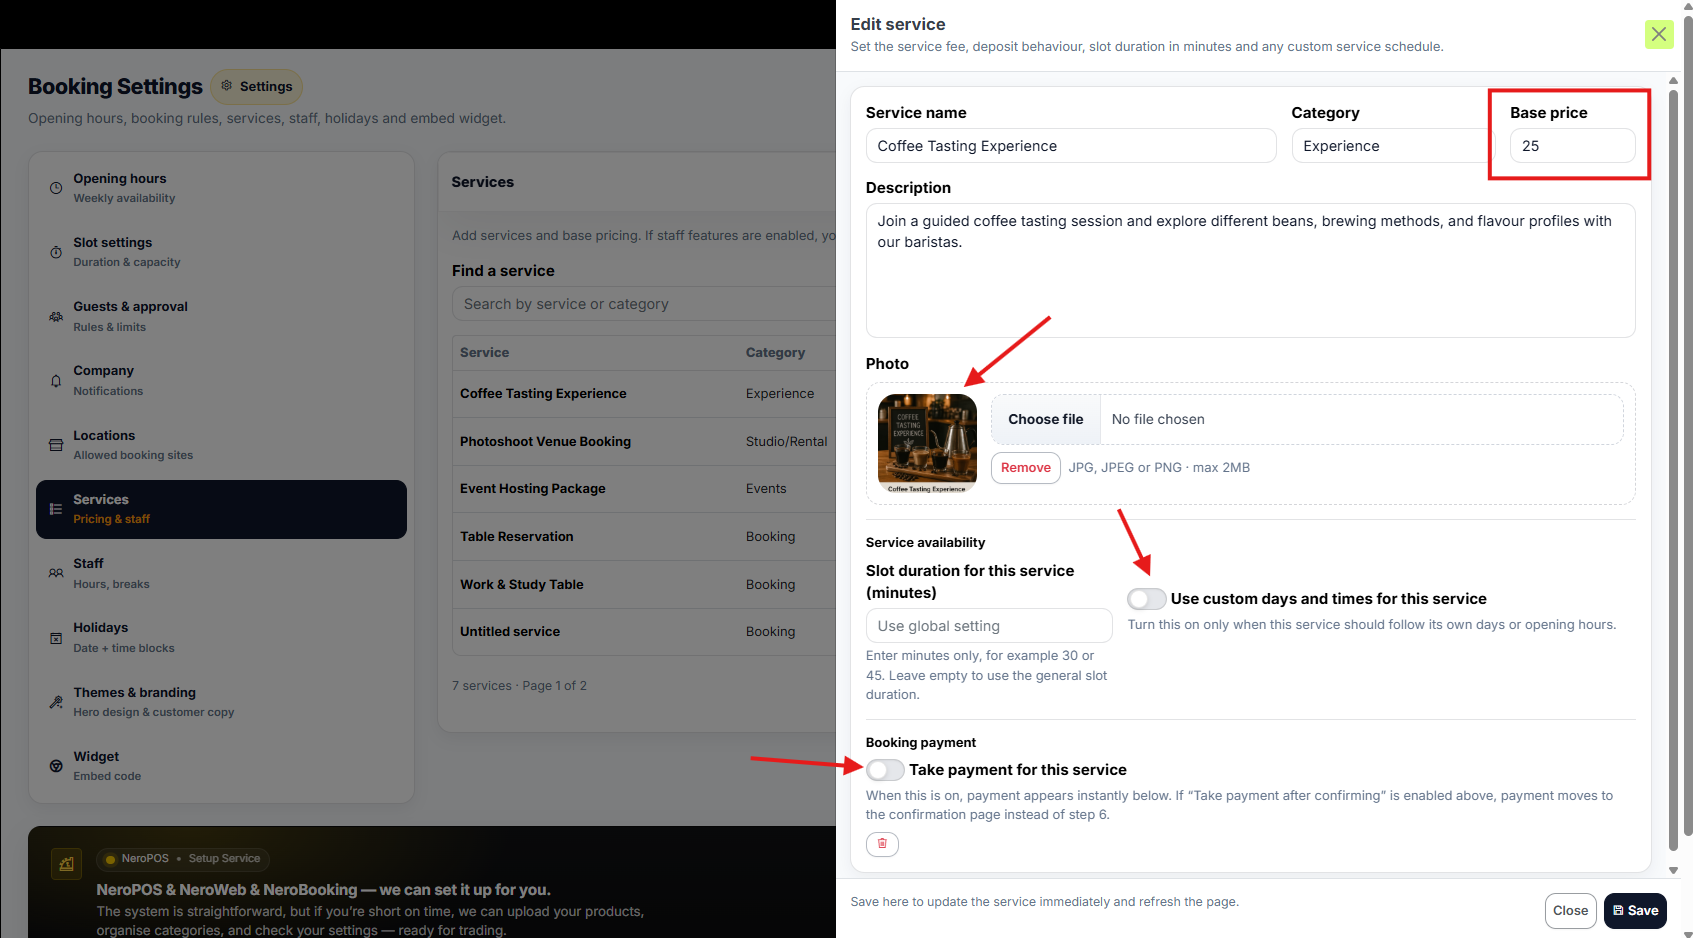
Step 4 — Set the base price
Enter the Base price for this service. This is the total amount the customer will see at checkout and on their confirmation.
💡 Example: If your service costs £25, set the base price as £25. You'll configure how much is due at booking in Step 6.
Step 5 — Set service availability
Set the slot duration for this specific service — how long each booking takes.
You can also toggle Use custom days and times if this service has different availability from your general opening hours. For example, a specific treatment only available on weekdays.
📸

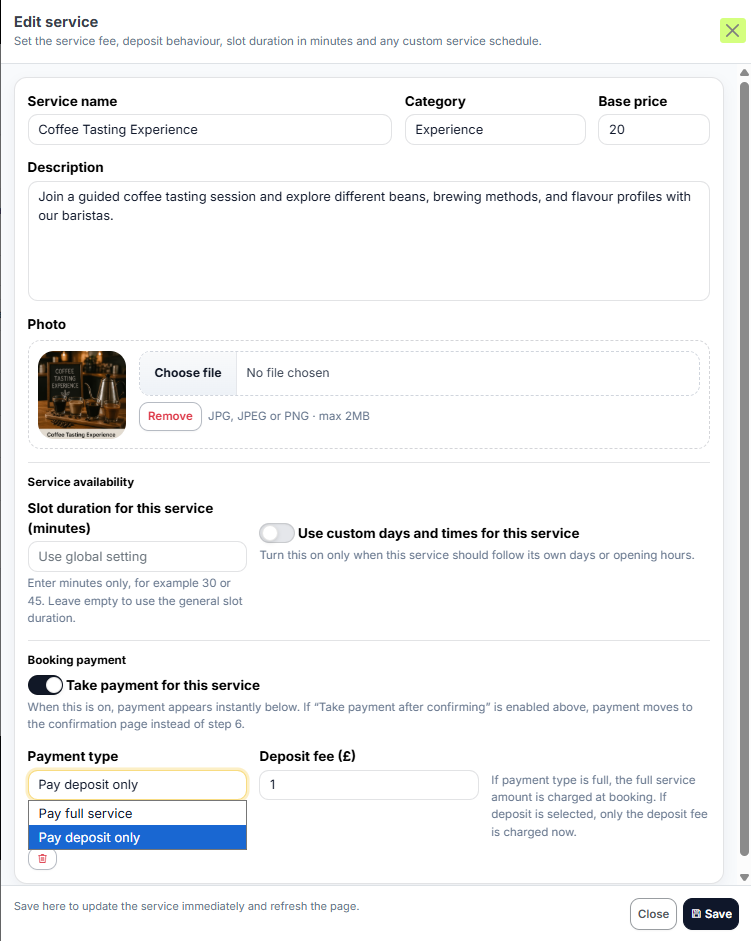
Step 6 — Configure booking payment for this service
Toggle Take payment for this service on or off depending on whether you want to collect payment at the time of booking.
If payment is enabled, choose your Payment type:
| Option | What it means |
|---|---|
| Pay deposit only | Customer pays a partial amount now, remainder is collected at the venue |
| Pay full amount | Customer pays the total at the time of booking |
If you select Pay deposit only, set the Deposit fee — the amount due at booking.
💡 Example: Base price £20, deposit £1 — customer pays £1 at booking, and the remaining £19 is collected at the venue.
📸
Part 2 — Global payment and refund settings
Step 1 — Go to Guests & approval settings
From your dashboard, follow this path:
NeroPOS → Bookings → Booking Settings → Guests & approval
Step 2 — Take payment after confirming
This setting controls when the customer is asked to pay:
- Off — customer pays during the booking flow, before confirmation
- On — customer pays on the confirmation page, after you manually approve the booking
⚠️ Note: If you require manual approval before payment, turn this setting on. Otherwise, leave it off for a fully automated flow.
📸
If you switch on Take payment after confirming:
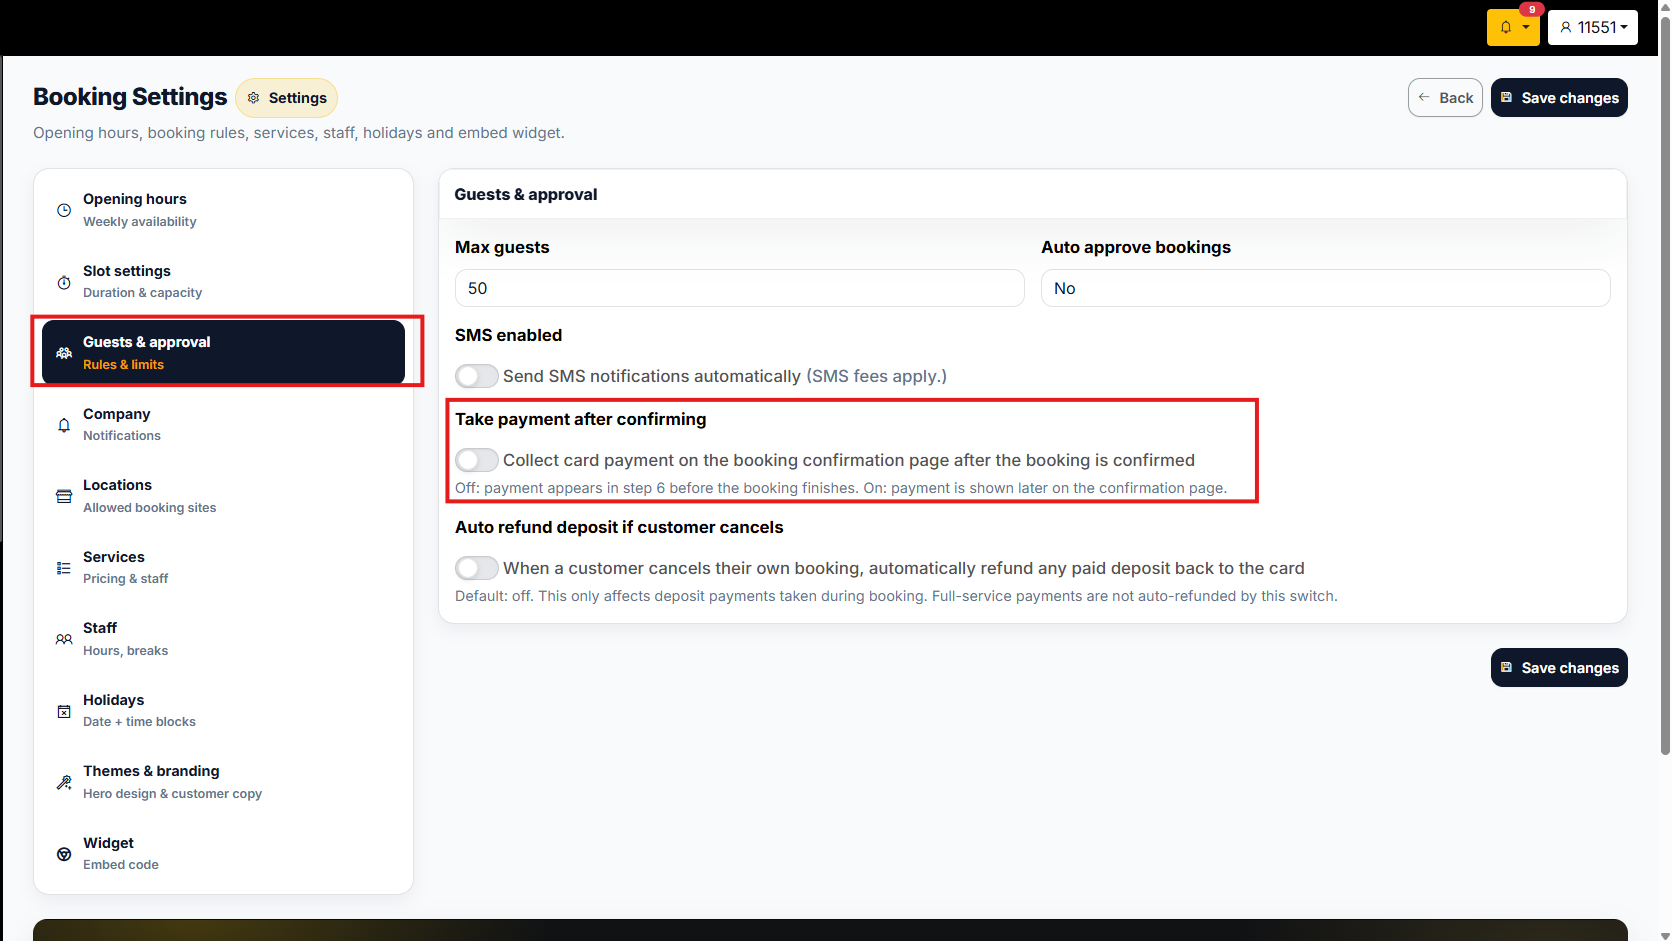
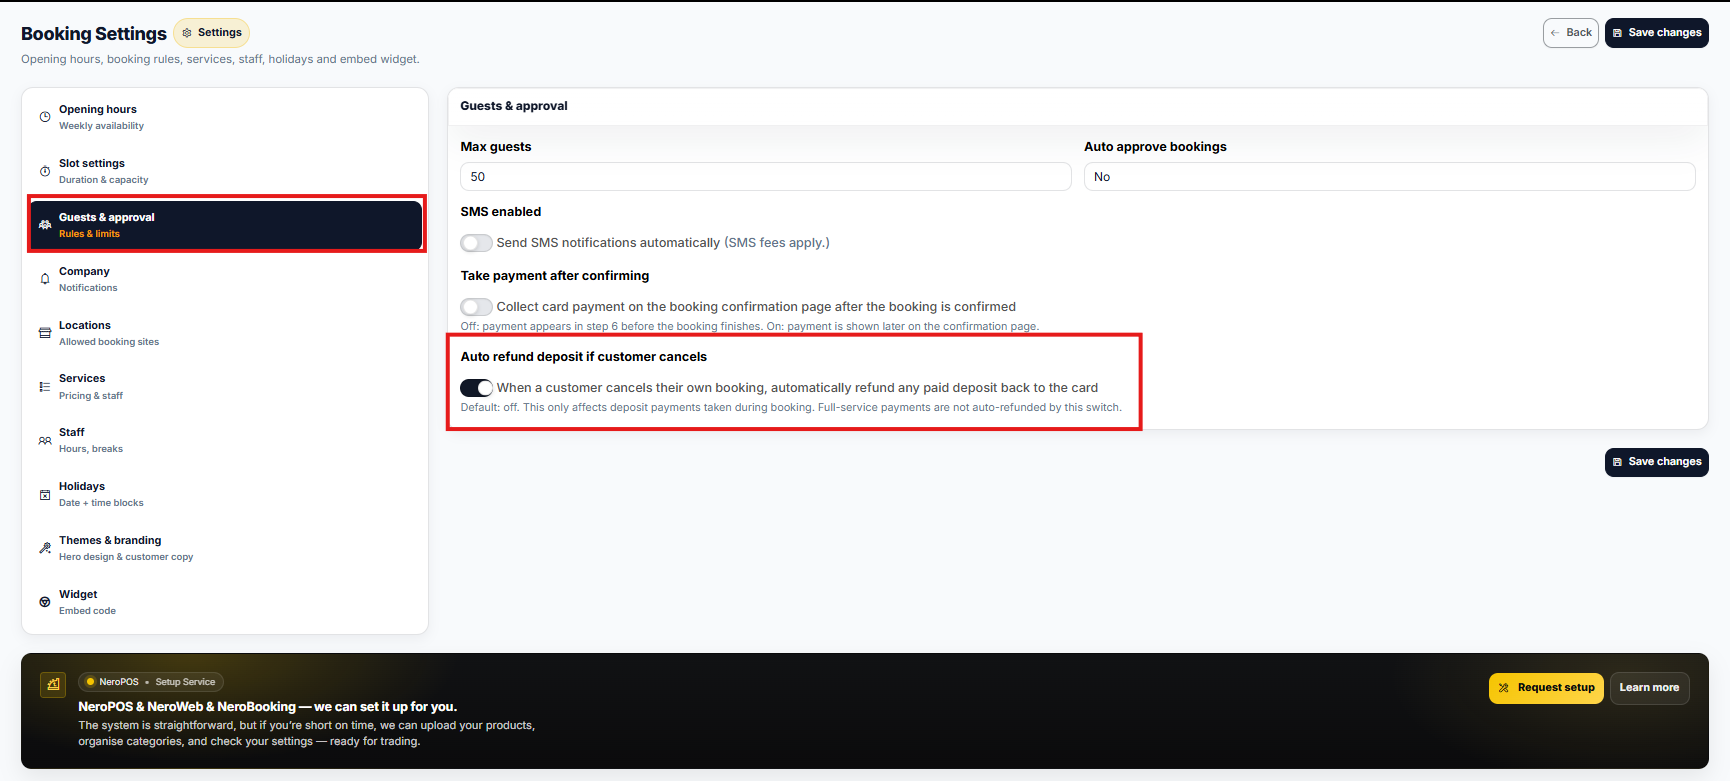
Step 3 — Auto-refund deposit if the customer cancels
This setting controls what happens when a customer cancels:
- On — the deposit is automatically refunded to the customer
- Off — the deposit is retained and must be refunded manually if applicable
📸
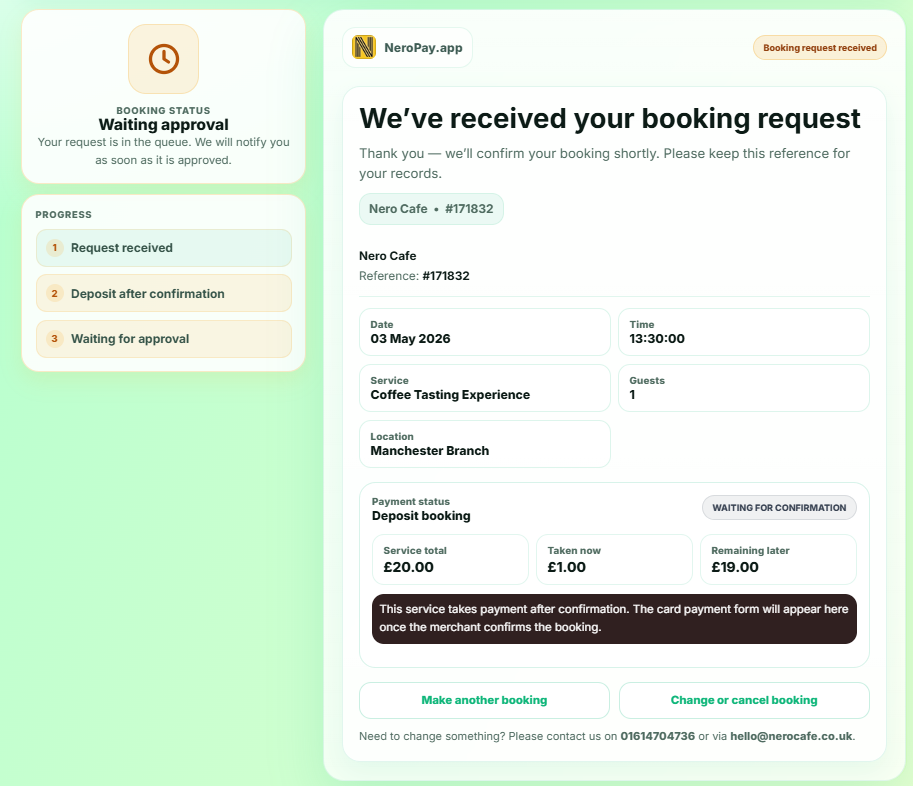
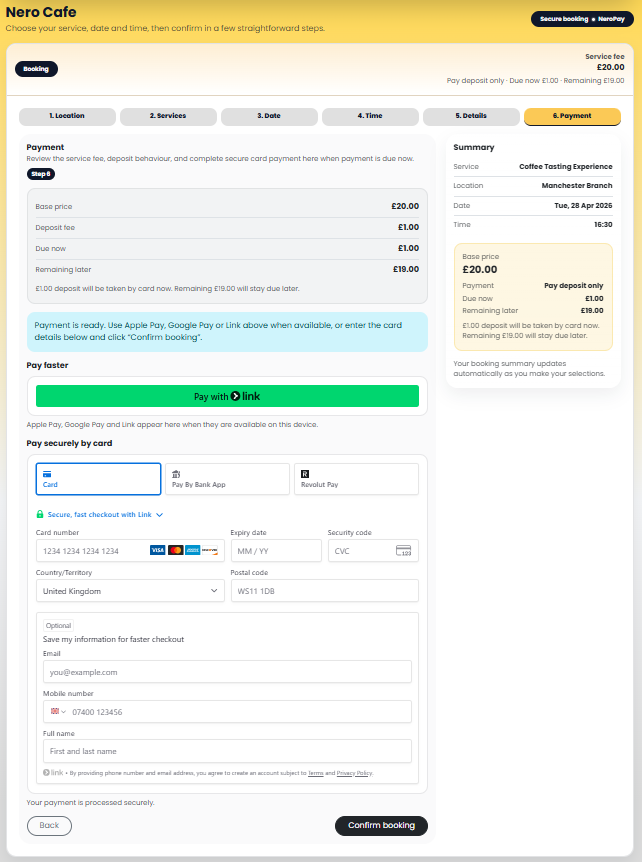
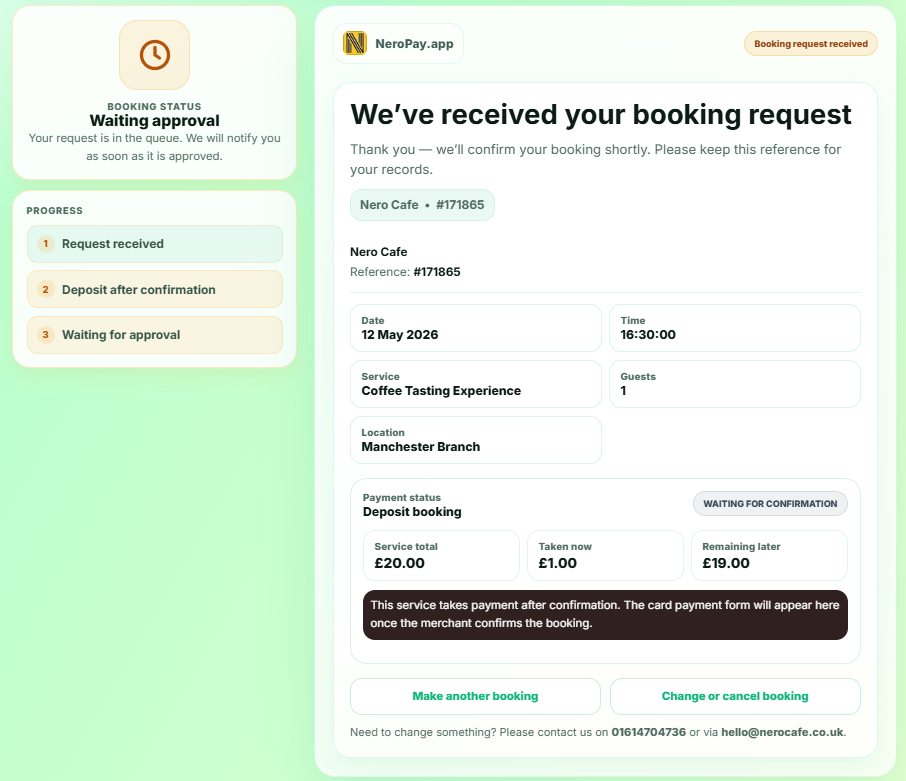
Part 3 — What customers see at checkout
When a customer completes a booking that requires payment, they will see a clear breakdown before paying:
- Base price — the total cost of the service
- Deposit fee — the amount due now
- Due now — what they are about to pay
- Remaining later — what will be collected at the venue
Accepted payment methods at this stage include card, Apple Pay, Google Pay, and Link.
📸
The same breakdown appears on the confirmation page, along with service name, staff member, location, date and time, deposit taken, and remaining balance.
📸
Part 4 — Managing payments and refunds
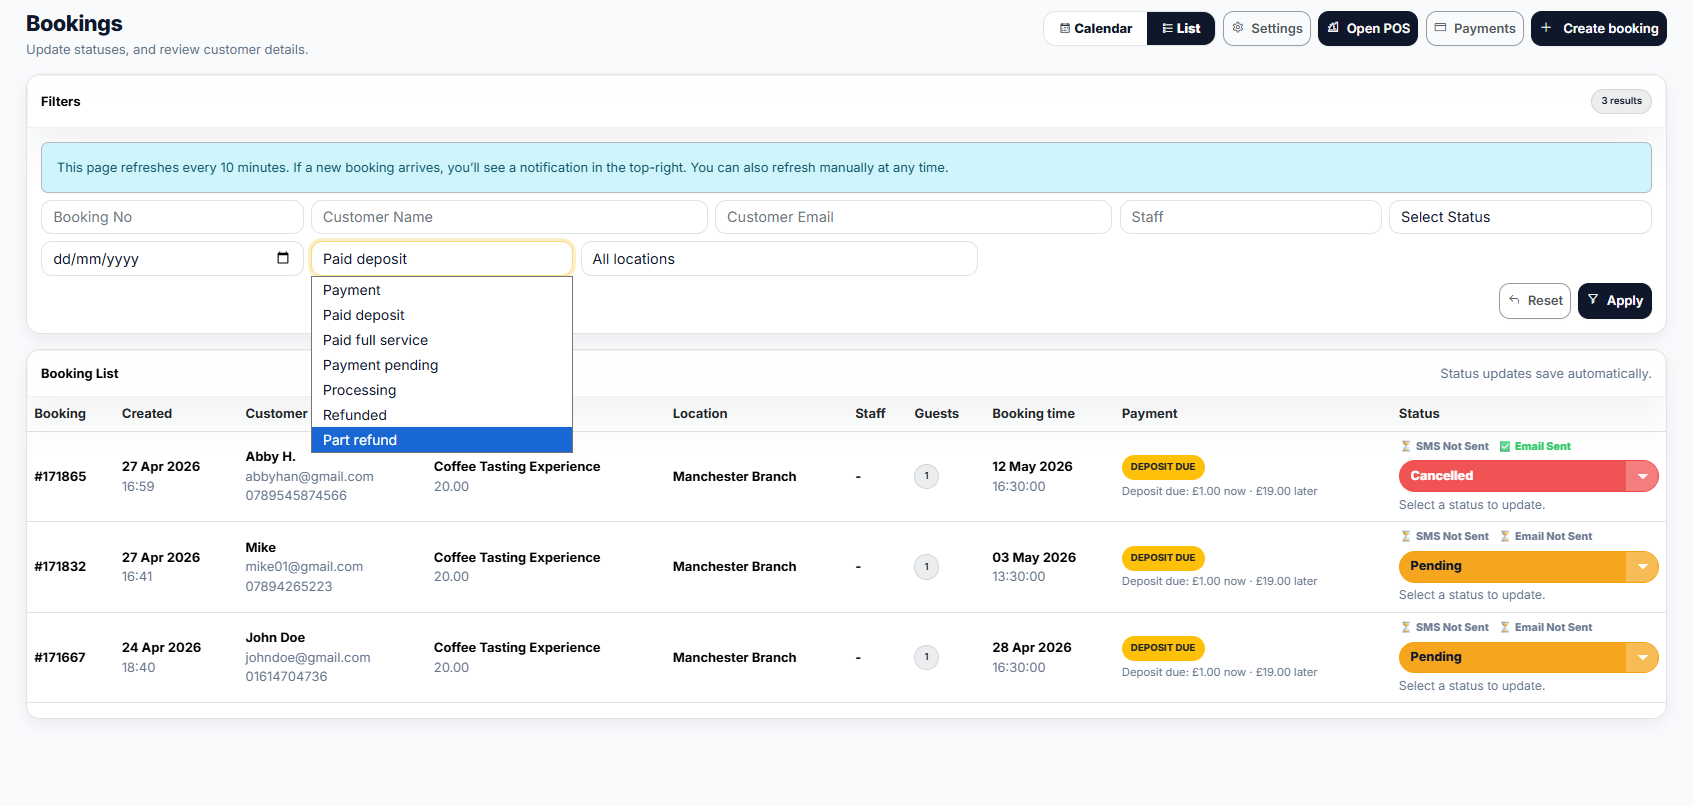
Step 1 — Go to your bookings list
From your dashboard, follow this path:
NeroPOS → Bookings → List
📸

Step 2 — Find the booking
Use the filters at the top to narrow down by date, payment status, or location.
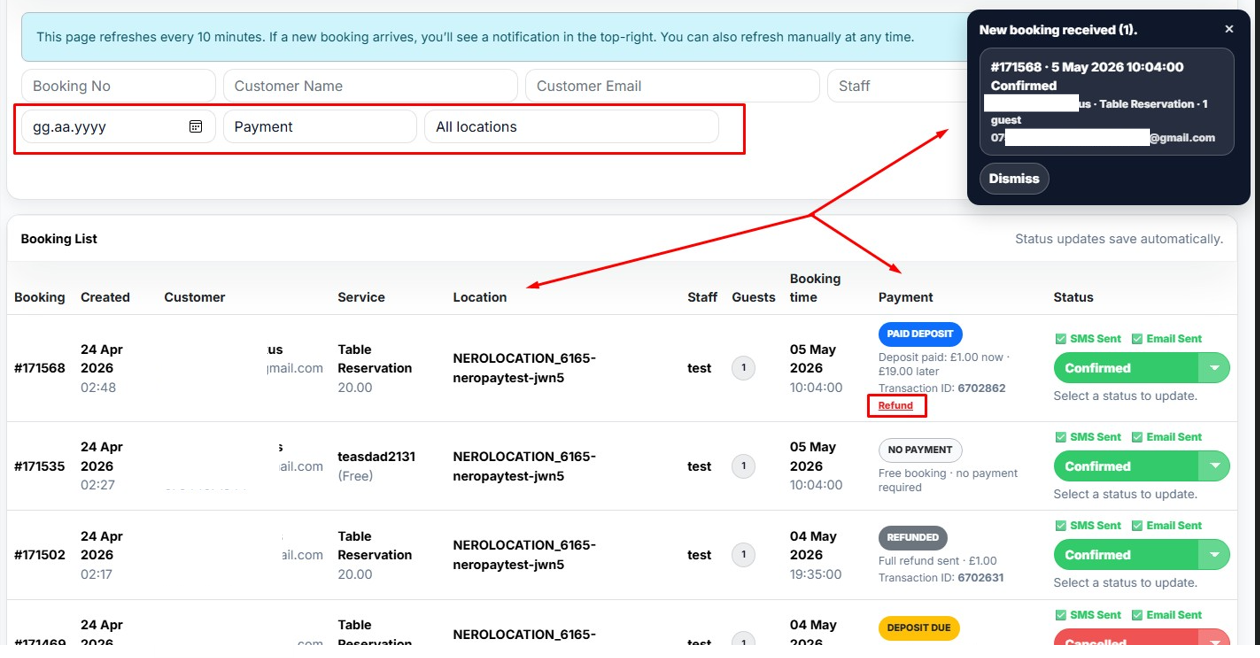
Step 3 — Open the payments panel
Click the Payments option from the top bar to open the payments side panel. Here you can see:
- Recent payment activity for the booking
- Payment status tags such as PAID DEPOSIT or REFUNDED
📸
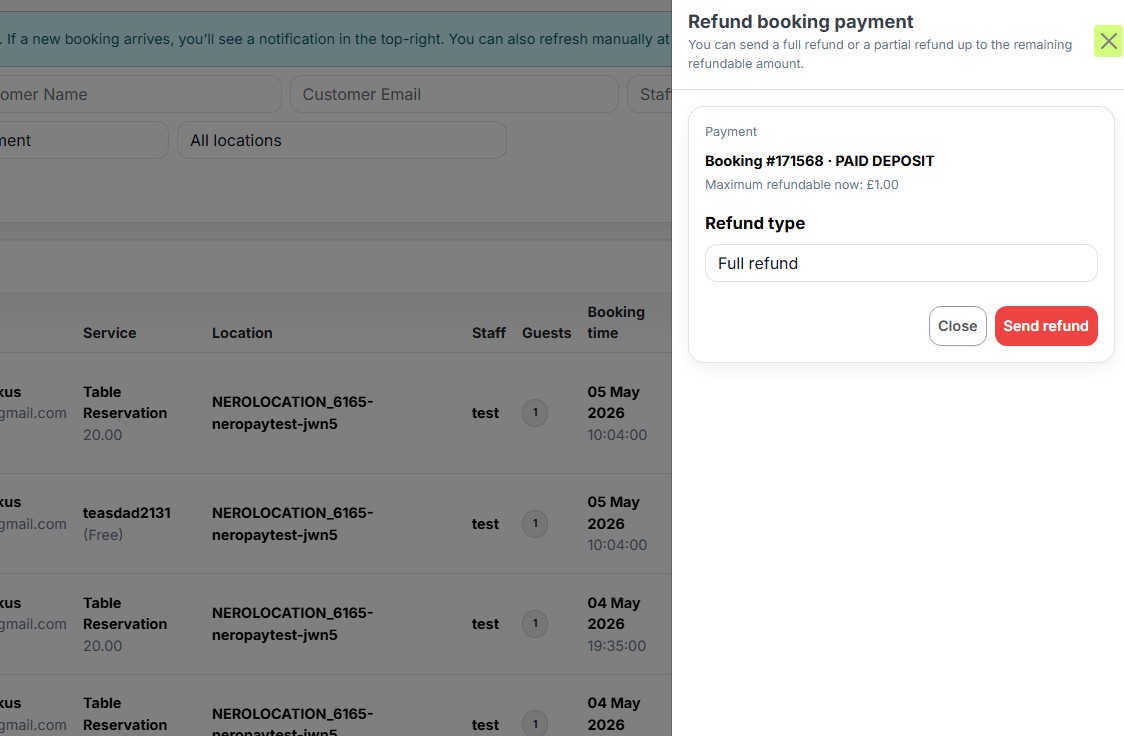
Step 4 — Process a refund
- Click Refund next to the payment you want to reverse
- A popup will appear showing the maximum refundable amount
- Choose between a full refund or partial refund
- Confirm the refund
📸
Step 5 — Confirm the status update
Once the refund is processed, the payment column and status tags in the bookings list will update automatically to reflect the change.
Before you go live — tips and checks
- ✅ Create a test service with a small deposit and run through the full booking and payment flow yourself
- ✅ Verify that the remaining balance shown on the confirmation page matches what your staff expect to collect on-site
- ✅ Check your cancellation and refund settings match your business policy
- ✅ Confirm that staff are assigned to the correct services
Frequently asked questions
Q: Can I set a different deposit amount for each service? A: Yes. The deposit fee is configured individually for each service in Step 6 above.
Q: What if I don't want to take payment at the time of booking? A: Toggle Take payment for this service off. Customers will be able to book without paying upfront.
Q: Can a customer pay the remaining balance online? A: No. The remaining balance is collected at the venue. Only the deposit or full payment is taken during the booking flow.
Q: How do I assign a staff member to a service? A: Staff assignment is managed in the Staff section of Booking Settings. See [Managing your staff →] for details.
Q: What happens if I refund a deposit — does the booking get cancelled automatically? A: No. A refund does not automatically cancel the booking. You will need to cancel it separately if needed.
Still need help? Contact us at support@neropay.app or create a ticket