How to get there
From your dashboard, follow this path:
NeroPOS → POS Settings
📸
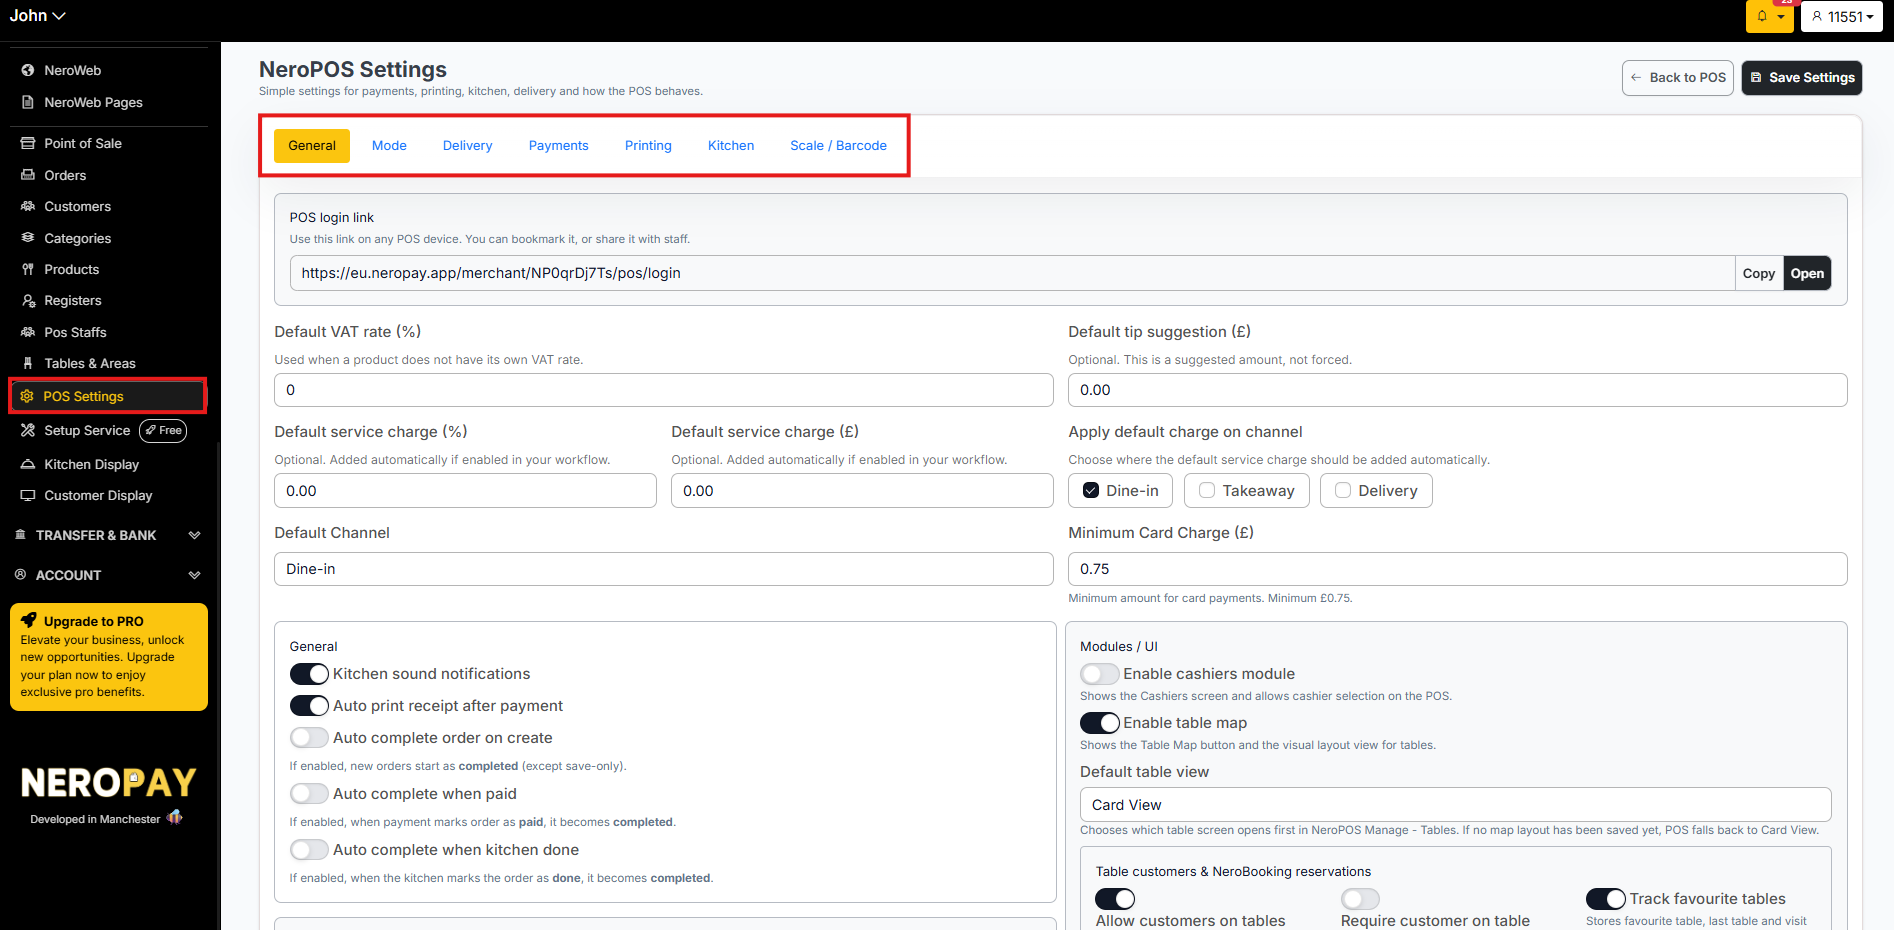
Tabs at a glance
| Tab | What it covers |
|---|---|
| General | POS login link, VAT, service charges, notifications, layout, and table settings |
| Mode | Receipt customisation — shop name, phone number, address, and footer text |
| Delivery | Delivery configuration and charges |
| Payments | Payment method settings and checkout behaviour |
| Printing | Receipt printing mode, Print Server setup, and automation |
| Kitchen | Kitchen display settings and order routing |
| Scale / Barcode | Scale and barcode scanner configuration |
Each tab is covered in detail in its own guide — links are provided at the bottom of this article.
General tab — what's inside
The General tab is the most used tab in POS Settings. Here's a breakdown of everything you can configure:
POS login link
Your unique POS login link is shown at the top of the page:
https://eu.neropay.app/merchant/XXXXXXXX/pos/login
Share this link with your staff so they can access the POS directly without going through the main dashboard. You can bookmark it on any POS device or copy it to share quickly.
💡 Tip: Using the POS login link means staff only access the point-of-sale screen — they won't be able to reach account settings or other sensitive areas of the dashboard.
📸

VAT and service charges
| Setting | What it does |
|---|---|
| Default VAT rate (%) | Applied automatically when a product does not have its own VAT rate set |
| Default service charge (%) | Optional — added automatically if enabled in your workflow |
| Default service charge (£) | Fixed amount alternative to the percentage-based service charge |
| Apply default charge on channel | Choose whether the service charge applies to Dine-in, Takeaway, Delivery, or a combination |
| Default tip suggestion (£) | A suggested tip amount shown at checkout — this is optional and not forced |
| Minimum card charge (£) | The minimum amount accepted for card payments — minimum is £0.75 |
| Default channel | Sets whether the POS defaults to Dine-in, Takeaway, or Delivery at checkout |
📸

Notifications and order completion
| Setting | What it does |
|---|---|
| Kitchen sound notifications | Plays a sound when a new order is sent to the kitchen |
| Auto print receipt after payment | Automatically prints a receipt after every payment — see [POS Settings — Printing →] |
| Auto complete order on create | New orders start as completed automatically, except save-only orders |
| Auto complete when paid | Order becomes completed automatically when payment is marked as paid |
| Auto complete when kitchen done | Order becomes completed automatically when the kitchen marks it as done |
Products grid — layout settings
| Setting | What it does |
|---|---|
| Colourful product cards | Uses light unique colours per product for faster visual scanning |
| Hide product images | Hides images on the POS screen — useful for faster loading on slower devices |
| Hide category images | Hides category images — also useful for slower devices |
| Categories per row | How many categories appear per row on the POS screen (1–8, default: 1) |
| Products per row | How many products appear per row (2–8, default: 3) |
| Products per page | How many products appear per page — set to 0 to show all products |
📸
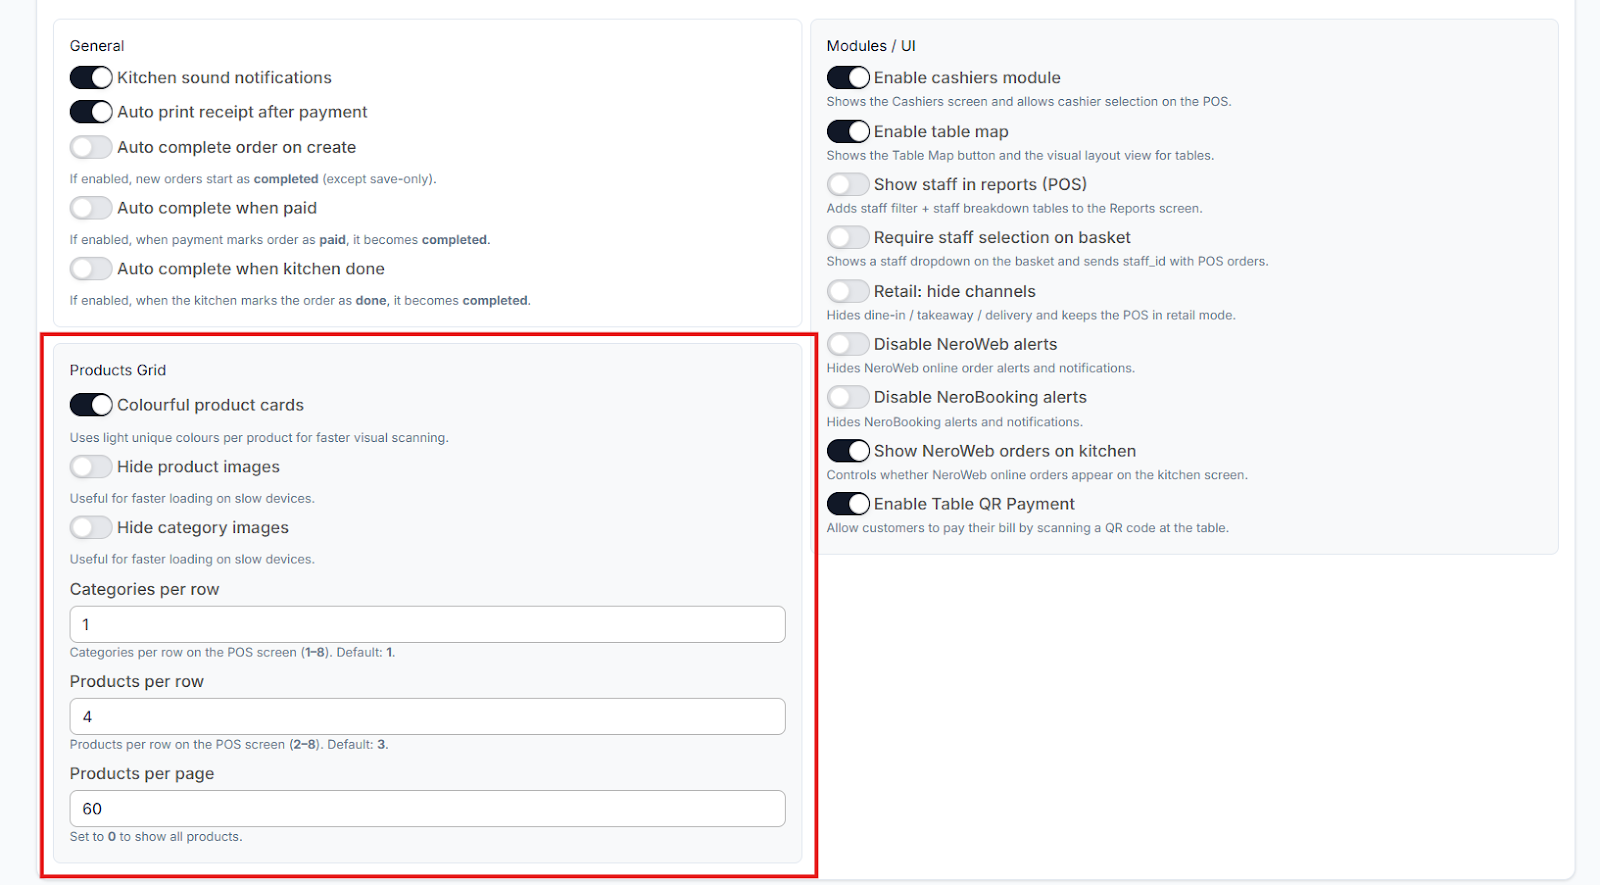
Modules and UI
| Setting | What it does |
|---|---|
| Enable cashiers module | Shows the Cashiers screen and allows cashier selection on the POS |
| Enable table map | Shows the Table Map button and visual layout view for tables — see [Setting up tables, areas and QR codes →] |
| Default table view | Chooses which table screen opens first — Card View or Map View. If no map layout has been saved, POS falls back to Card View |
| Default booking table view | Sets the view used when NeroBooking reservations are shown inside NeroPOS |
| Default table sorting | Controls the default order of table cards and the tables management list |
Table customers and NeroBooking reservations
| Setting | What it does |
|---|---|
| Allow customers on tables | Lets staff attach a new or existing customer to a table — required for table management. See [Setting up tables, areas and QR codes →] |
| Require customer on table | Makes customer assignment mandatory for every table. Off by default so restaurants can still open walk-in tables quickly |
| Track favourite tables | Stores each customer's favourite table, last table used, and visit count on their customer record |
Additional modules
| Setting | What it does |
|---|---|
| Show staff in reports (POS) | Adds a staff filter and staff breakdown to the Reports screen |
| Require staff selection on basket | Shows a staff dropdown on the basket and sends staff ID with POS orders |
| Retail: hide channels | Hides dine-in, takeaway, and delivery options — keeps the POS in retail mode |
| Itemised VAT breakdown on receipts | Shows the VAT included for each product line on receipts, and hides the single VAT total line. Applies to both NeroPOS and NeroWeb receipts |
| Disable NeroWeb alerts | Hides online order alerts and notifications from NeroWeb |
| Send SMS on refund / cancel updates | Sends customers an SMS when an order is refunded or cancelled. Email notifications are still sent regardless. SMS fees apply |
| Disable NeroBooking alerts | Hides NeroBooking alerts and notifications |
| Print booking receipt automatically | When a new booking arrives, NeroPOS queues a small booking receipt for the POS printer automatically |
| Show NeroWeb orders on kitchen | Controls whether NeroWeb online orders appear on the kitchen screen |
| Enable table QR payment | Allows customers to pay their bill by scanning a QR code at the table |
Frequently asked questions
Q: Where do I find the login link to share with my staff? A: It's at the top of the General tab under POS login link. Click Copy to copy it to your clipboard.
Q: What is the difference between Auto complete when paid and Auto complete when kitchen done? A: Auto complete when paid marks an order as completed as soon as payment is taken. Auto complete when kitchen done marks it as completed only when the kitchen confirms the order is ready. Use whichever matches your workflow.
Q: Can I apply the service charge to online orders as well as in-store? A: Yes. Use the Apply default charge on channel setting to choose which channels the service charge applies to — Dine-in, Takeaway, Delivery, or a combination.
Q: My POS is running slowly — what settings can help? A: Try enabling Hide product images and Hide category images in the Products Grid section. Reducing the number of products per page can also improve performance on slower devices.
Still need help? Contact us at support@neropay.app or create a ticket