Skip to the content

NeroPay DocsNeroPay Docs

  • Docs
  • NeroPay Website
  • System Status
  • Contact Support
  • Docs
  • NeroPay Website
  • System Status
  • Contact Support
  • Common Questions

    • About NeroPay

    • Devices & Solutions

    • Setup & Onboarding

    • Fees, Rewards & Pricing

    • Payments & Payouts

    • Security, Disputes & Compliance

    • Support

    • Identity Verification

  • Security

    • Reserve Balance & Extra Security Verification

  • Dashboard

    • Set Up and Use NeroPay’s Transfer Schedule

    • Link Your Bank Account

    • Pay Out Funds

    • Creating A Ticket For Customer Support

    • Sign Up and Apply for a NeroCard

    • NeroCard PIN Management

    • Refund

    • Transactions

    • Reports Overview

    • Add Bank Account

    • Rewards & Gifts

    • Transfer Money

    • Transfer History

    • Account & Profile Settings

    • Money Payout Schedule

    • Top Up Money

    • Tap to Pay

  • NeroPay Terminal

    • Use The NeroPay Card Terminal

    • NeroPay Terminal Onboarding Guide

    • How to Return Your NeroPay Terminal

    • Setup Card Terminal

    • Install NeroPay Terminal to Tablet

    • Terminal Security Settings

    • Display Timeout

  • Checkout API

    • Rest API

    • Ready-to-Use Plugins

      • WooCommerce
      • NeroPay for Odoo
      • NeroPay for Wix
      • NeroPay for Perfex Crm
      • NeroPay for Zapier
  • Account Setting

    • Verification

    • Sign Up

    • Reactivation Guide

    • Complete Your Registration

    • Verify Bank Account

  • Bookings

    • Bookings Overview

    • Booking Settings

  • Nero Partner Programme

    • FAQ

    • Earnings & Commission

    • Referral Process

    • Merchant Eligibility

    • Programme Rules & Terms

    • Tools & Support

    • Practical Scenarios

    • Growth & Performance

  1. Docs
  2. Dashboard
  3. Pay Out Funds

Pay Out Funds

Step 1 – Go to Payouts / Allocation
  1. Log into your NeroPAY account.
  2. Navigate to the Payouts or Pay Out Funds section.
  3. You’ll see the maximum available balance at the top (e.g. “Max you can transfer now: £101.00”).
  4. Below, you’ll see the connected bank accounts where funds can be allocated.

Payouts screen - step 1Allocation screen - step 1

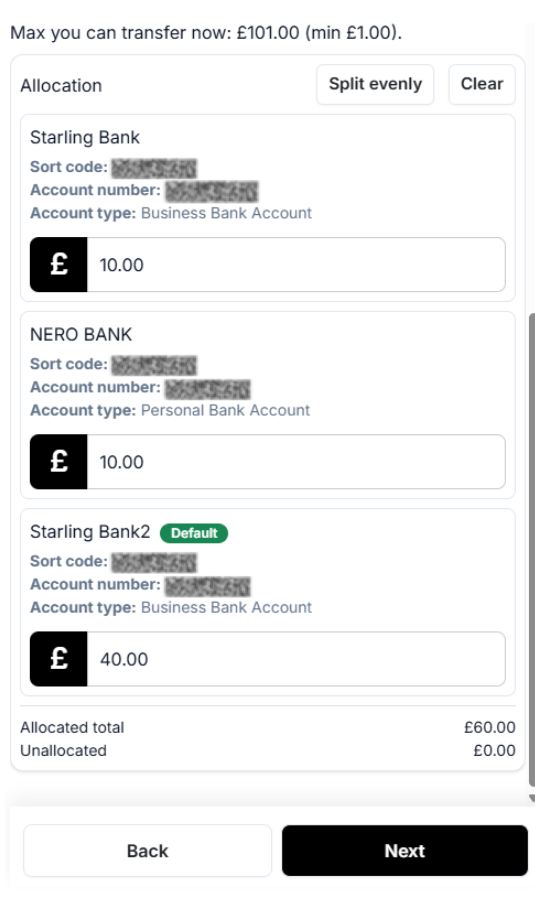
Step 2 – Allocate Funds
  1. You have two options:
  2. Manual Allocation – Type in the exact amount (£) you want to send to each bank.
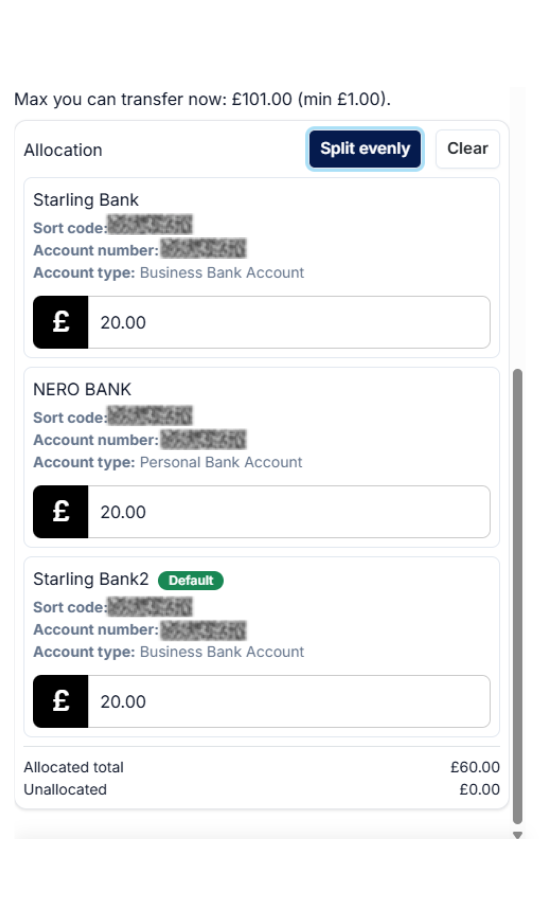
  3. Split Evenly – Click the Split evenly button to automatically divide the balance across your selected accounts.
  4. You can also Clear if you need to reset the amounts.
  5. As you enter the amounts, the Allocated total will update at the bottom.
  6. Make sure Unallocated = £0.00 before moving on.

Allocation options - step 2

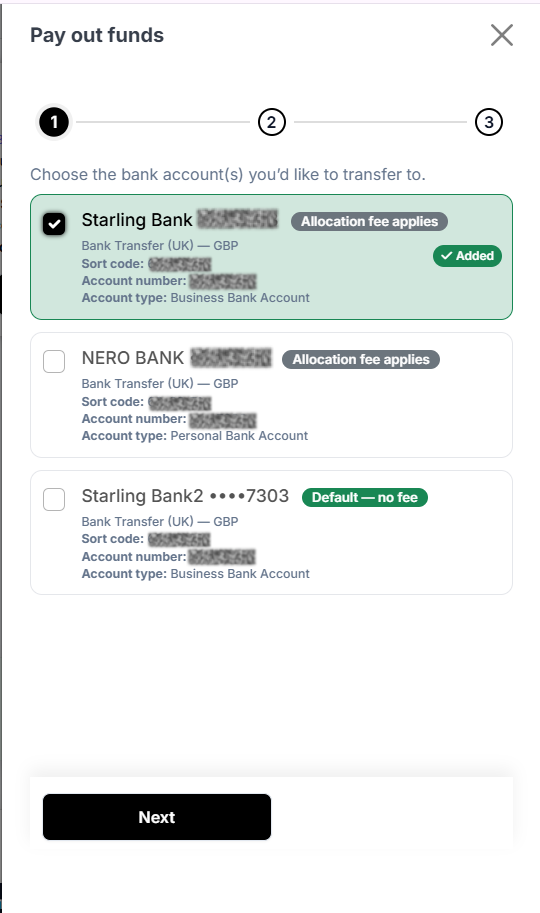
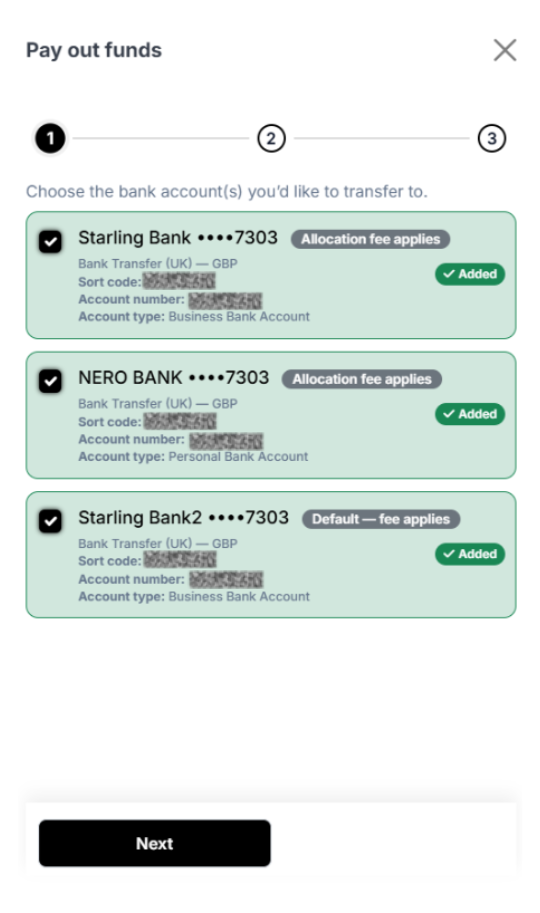
Step 3 – Confirm Accounts
  1. Click Next.
  2. On the next screen, you’ll see the accounts you selected to transfer to.
  3. Each account shows:
  4. Bank name (e.g., Starling Bank, Nero Bank).
  5. Sort code & account number.
  6. Account type (Business or Personal).
  7. Fee info (e.g., “Allocation fee applies” or “Default – fee applies”).
  8. Make sure the correct accounts are ticked.

Confirm accounts - step 3

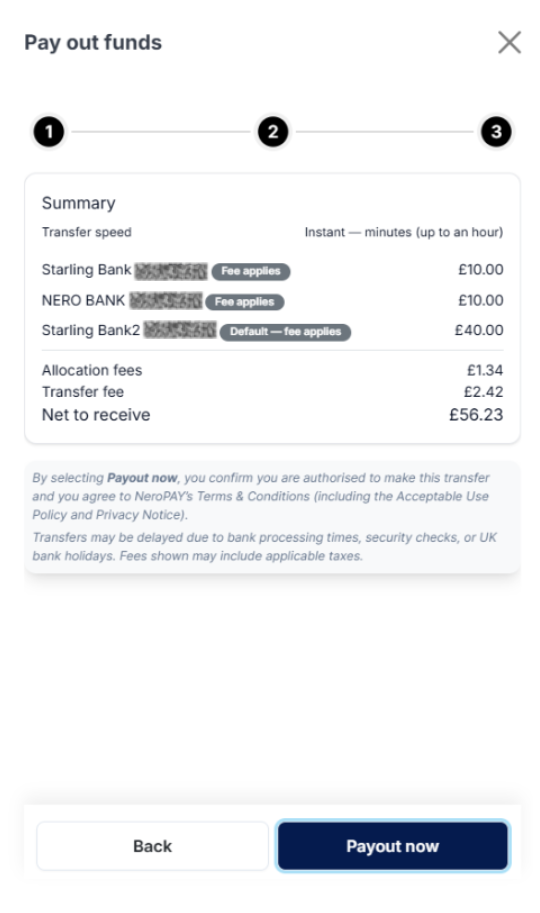
Step 4 – Review: Pay Out
  1. Check the total amount allocated.
  2. Check the accounts selected.
  3. Check any fees applied.
  4. When you’re happy, click Next to confirm.
  5. NeroPAY will process the payout, transferring the allocated funds to your chosen accounts.

Review payout - step 4

Tips
  1. Always make sure the Unallocated amount = £0.00 before moving forward.
  2. If you need to change your allocation method, click Clear and re-enter or use Split Evenly.
  3. Check labels like Default or Fee applies before confirming.
Views: 52
How do you feel about this docs?
0 0 0
In this page:

    © 2025 NeroPay Docs

    Supported by Nero Group

    To the top ↑ Up ↑